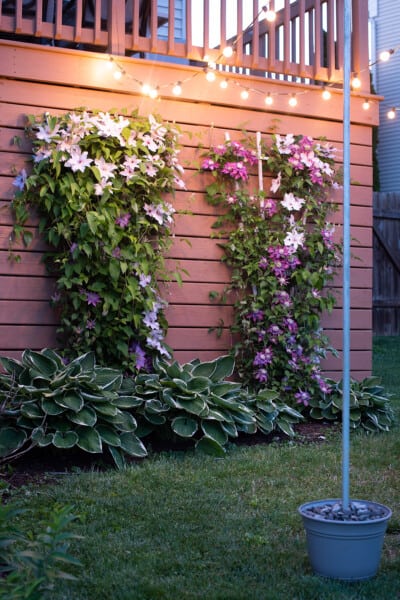
How To Hang Patio Lights
Learn how to hang outdoor string lights on a deck, patio, or backyard even if you don't have a structure or house to attach the lights to.
Yield: 1 patio
Cost: $20-200
Materials
- 8 ft Galvanized Metal Conduit
- 2 ft Wider Pipe (PVC or Metal) You will insert the 8ft conduit into this, so it should be somewhat snug.
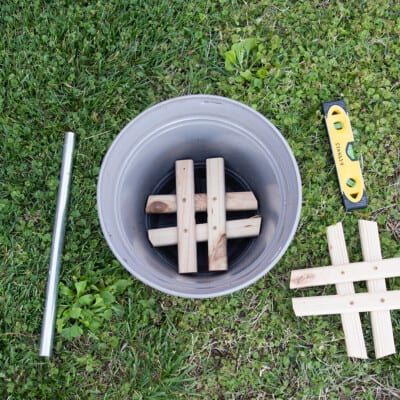
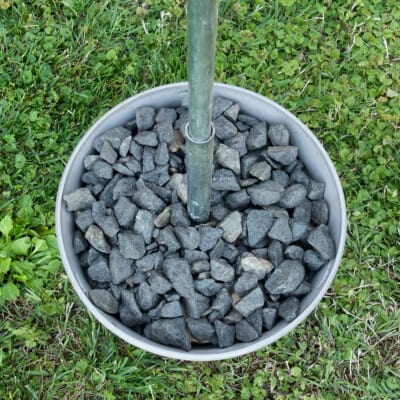
- 1 Planter Pot Fairly large in size.
- 25 lbs Drainage Rock
- 5 ft 1x2 wood or composite boards
- 1 Squeeze Connectors Appropriate size for your conduit.
- 1 Metal Cap For pole to screw in the squeeze connector.
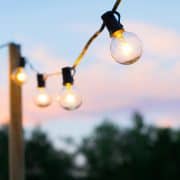
- String Lights
Instructions
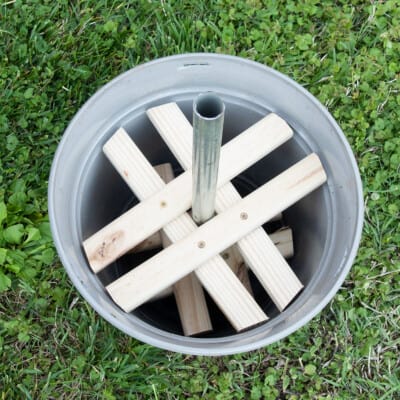
- You will need two braces for the center of each pot to stabilize the pole. They can be made of wood or composite (won't rot). We cut some scrap wood and screwed it together so that the pole went through the center of the pot. The smaller brace is in the bottom and the larger is a few inches below the top of the pot.
- Cut the wider pole so that it is several inches higher than the top of the pot. Push the pole through the center of the braces and make sure that it is plumb (straight up and down) with a level. We use a shorter pole so that this setup can easily be broken down for storage.
- Fill the pot with gravel or drainage rock. If you want to add plants to the pot, you could add drainage rock to the bottom of the pot for stability and dirt on top.
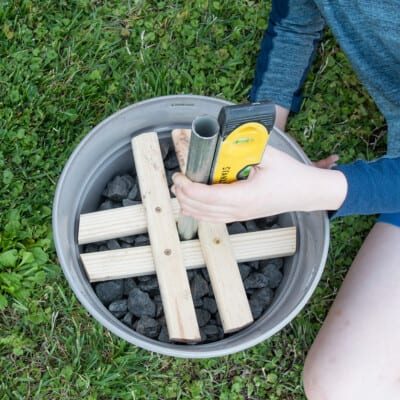
- Insert the longer pole into the shorter pole.
- Hang the string lights at the top of the pole using squeeze connectors.
Notes
More Ways to Hang String Lights
- Weave them through fence panels and droop the lines.
- Hang vertically down a wall.
- Sling them around sturdy tree branches in an organic way.
- Create permanent light posts in the backyard by concreting in 4x4 posts and adding screw-eye hooks for the lights.
- In Ground Installation. Dig a post hole and concrete in a PVC pipe at least 12-18 inches below grade -make sure to get caps for the pvc pipe so that debris don't get inside. Then you can put a snug fitting 8ft pole in whenever you like.
- Use a sturdy Outdoor umbrella stand. Great for rental properties!
- Vinyl Siding Clamps are good for hanging on your house without making holes. Do make sure to pay attention to the maximum weight. Brick Hook Clips also work.
