• Home
  • Home Projects
  • Recipes
  • Fall
  • About
menu icon
go to homepage
  • DIY Home Projects
  • Recipes
  • Fall
  • Free Email Series
  • About
    • Facebook
    • Instagram
    • Pinterest
  • search icon
    Homepage link
    • DIY Home Projects
    • Recipes
    • Fall
    • Free Email Series
    • About
    • Facebook
    • Instagram
    • Pinterest
  • ×
    Home » Home Decorating » Spring Décor

    Easy Easter Bunny Pouch Craft

    by Rachel · Updated May 31, 2022 · 24 Comments

    This page may contain affiliate links.
    ↓ Jump to Instructions
    Pin the Recipe

    I am absolutely gushing over these adorable felt bunnies! Similar to fabric origami, this craft is super easy and takes less than 15 minutes to make. Great craft project for kids, parties, or Spring and Easter crafts.

    Colorful folded felt bunnies with googly eyes, ribbon, and glitter faces in a row on white surface.

    Table of Contents

    Toggle
    • Supplies
    • Steps to Making a Bunny Pouch
    • More Spring Crafts You Might Enjoy
    • How To: Easy Easter Bunny Pouch Craft

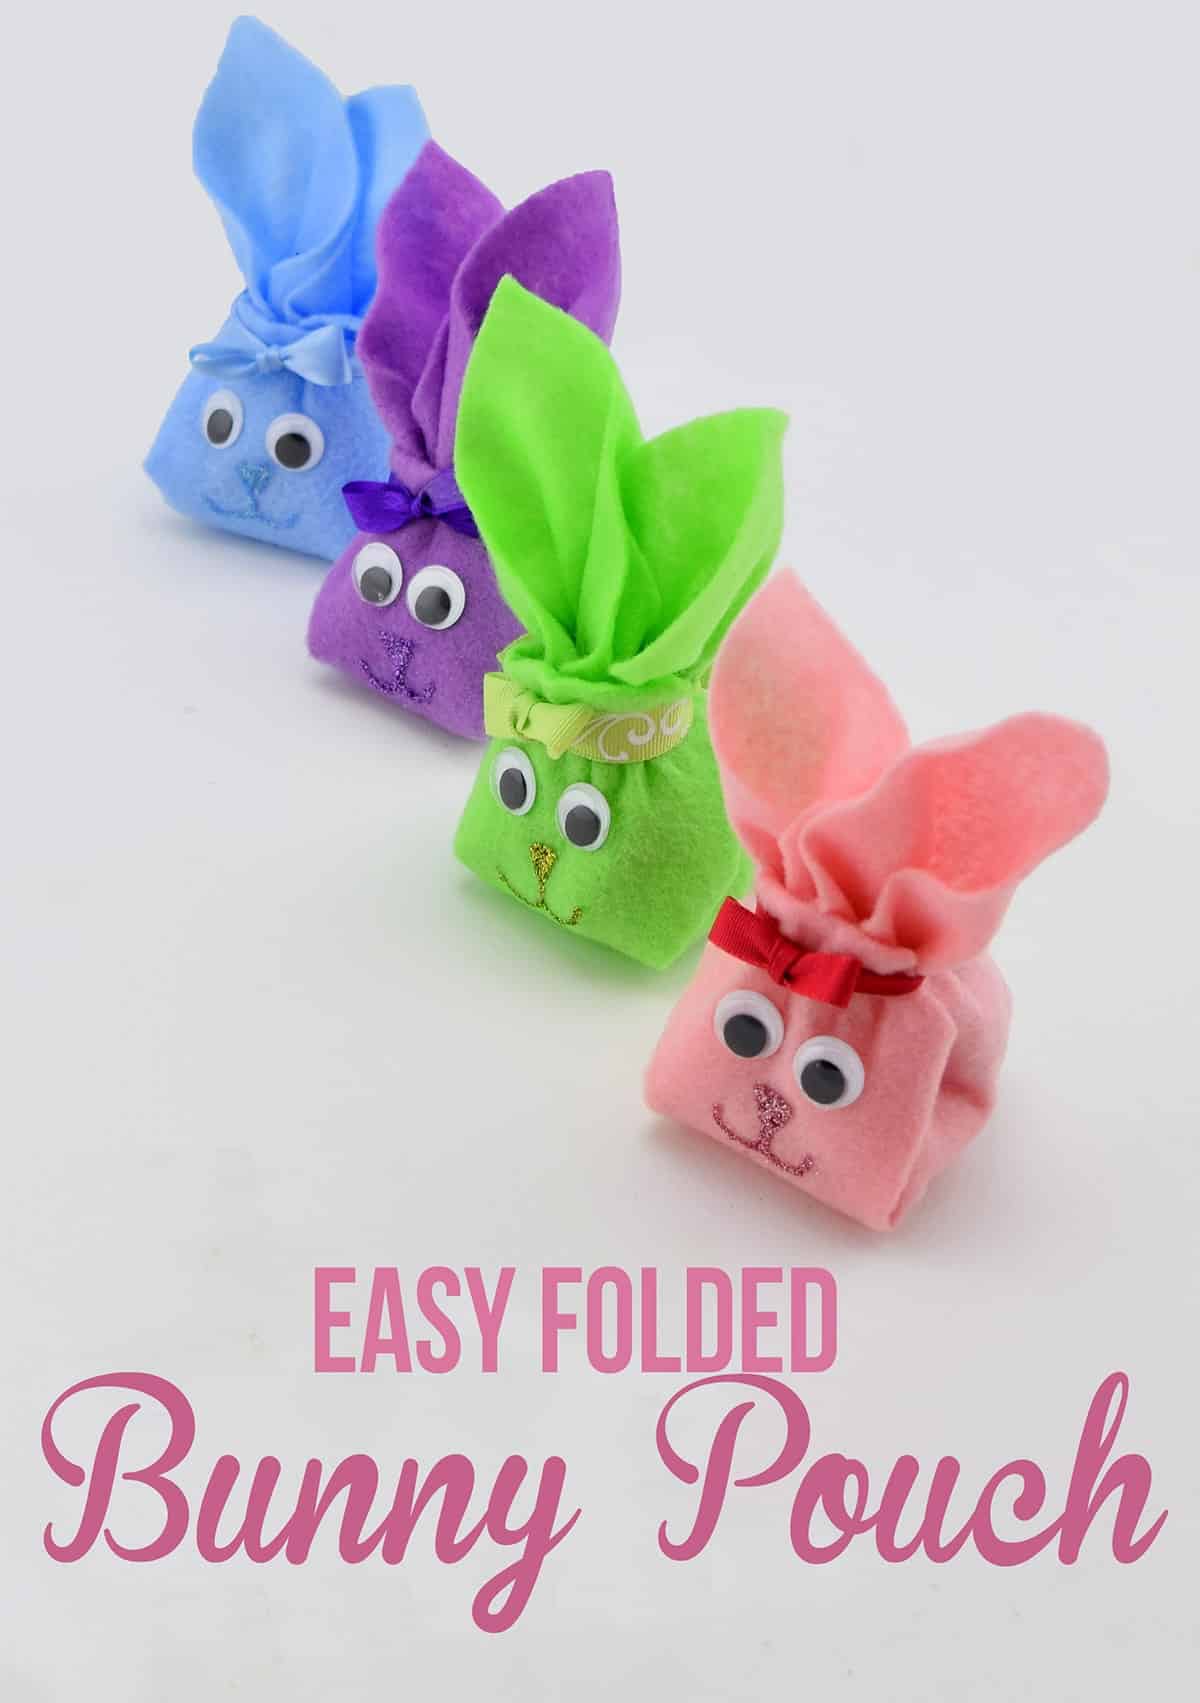
    We love simple spring crafts! These folded bunny pouches are the cutest solution to what to do with loose Easter candy in baskets or treats for an Easter party. I used these little guys during my Easter table decorations for parties and they are a big hit with the kids.

    As a kid, my mom used to divvy up the loose candy (like M&Ms, Robin’s Eggs) between the kids and tossed them in the basket intermixed in the grass. It looked cute, like little eggs hidden in the grass. But here’s the thing – we always used the same grass every year and no one washes plastic grass. Think about that for a second…. yeah…. a little gross.

    Supplies

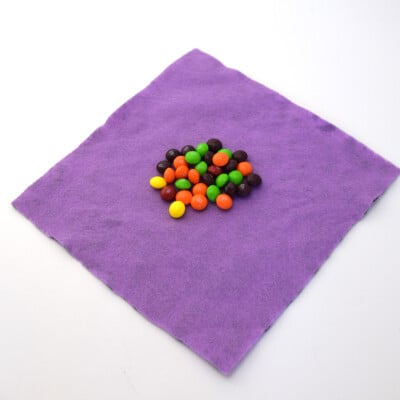
    • A square piece of fabric but I imagine a napkin would work well too. I used an 8×8 piece of felt.
    • Candy or other small filler
    • Googly Eyes
    • Ribbon
    • Rubber Band
    • Glitter Glue (multiple colors)

    Steps to Making a Bunny Pouch

    The step by step is included in the tutorial card at the bottom of this post, so this section is more of a visual guide to show you how it comes together.

    Steps of folding fabric or napkin into a bunny shape filled with candy.

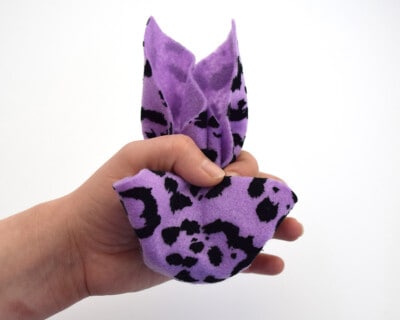
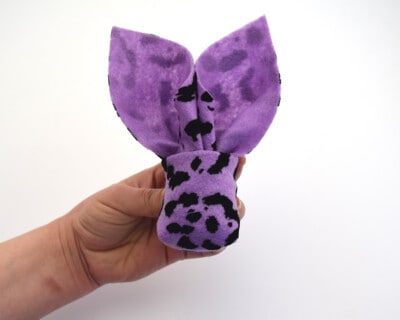
    The bunny folds up super easy, almost like a fabric origami. I love the ears especially- they are so realistic looking!

    Folded blue felt rabbit pouch with blue ribbon tie.

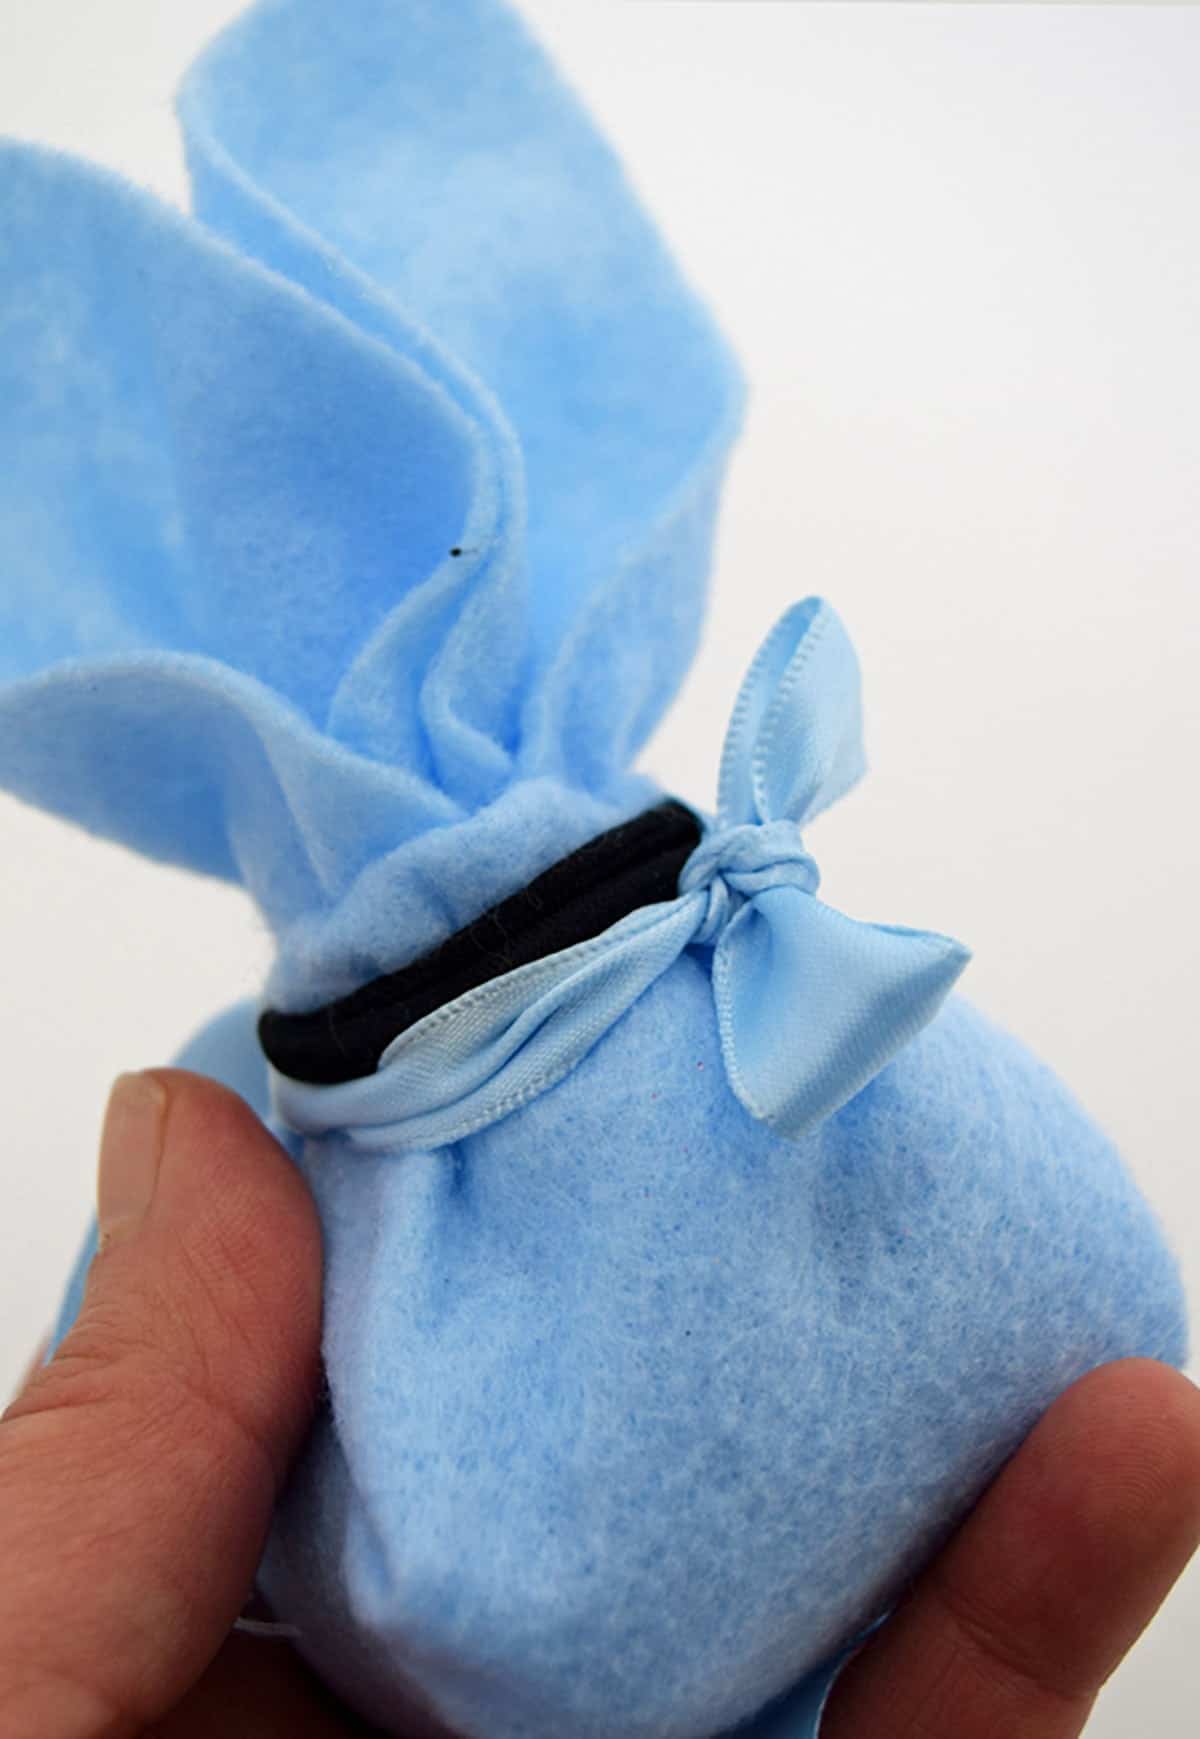
    The ears are secured with a rubber band. I used a fabric hairband. Depending on what ribbon you choose, you may be able to hide the rubber band under it for a more secure fitting. However, I found that I could gently remove the rubber band after I had secured the pouch with the ribbon.

    DIY blue felt bunny pouch with googly eyes held in hand painting glitter nose and mouth on front.

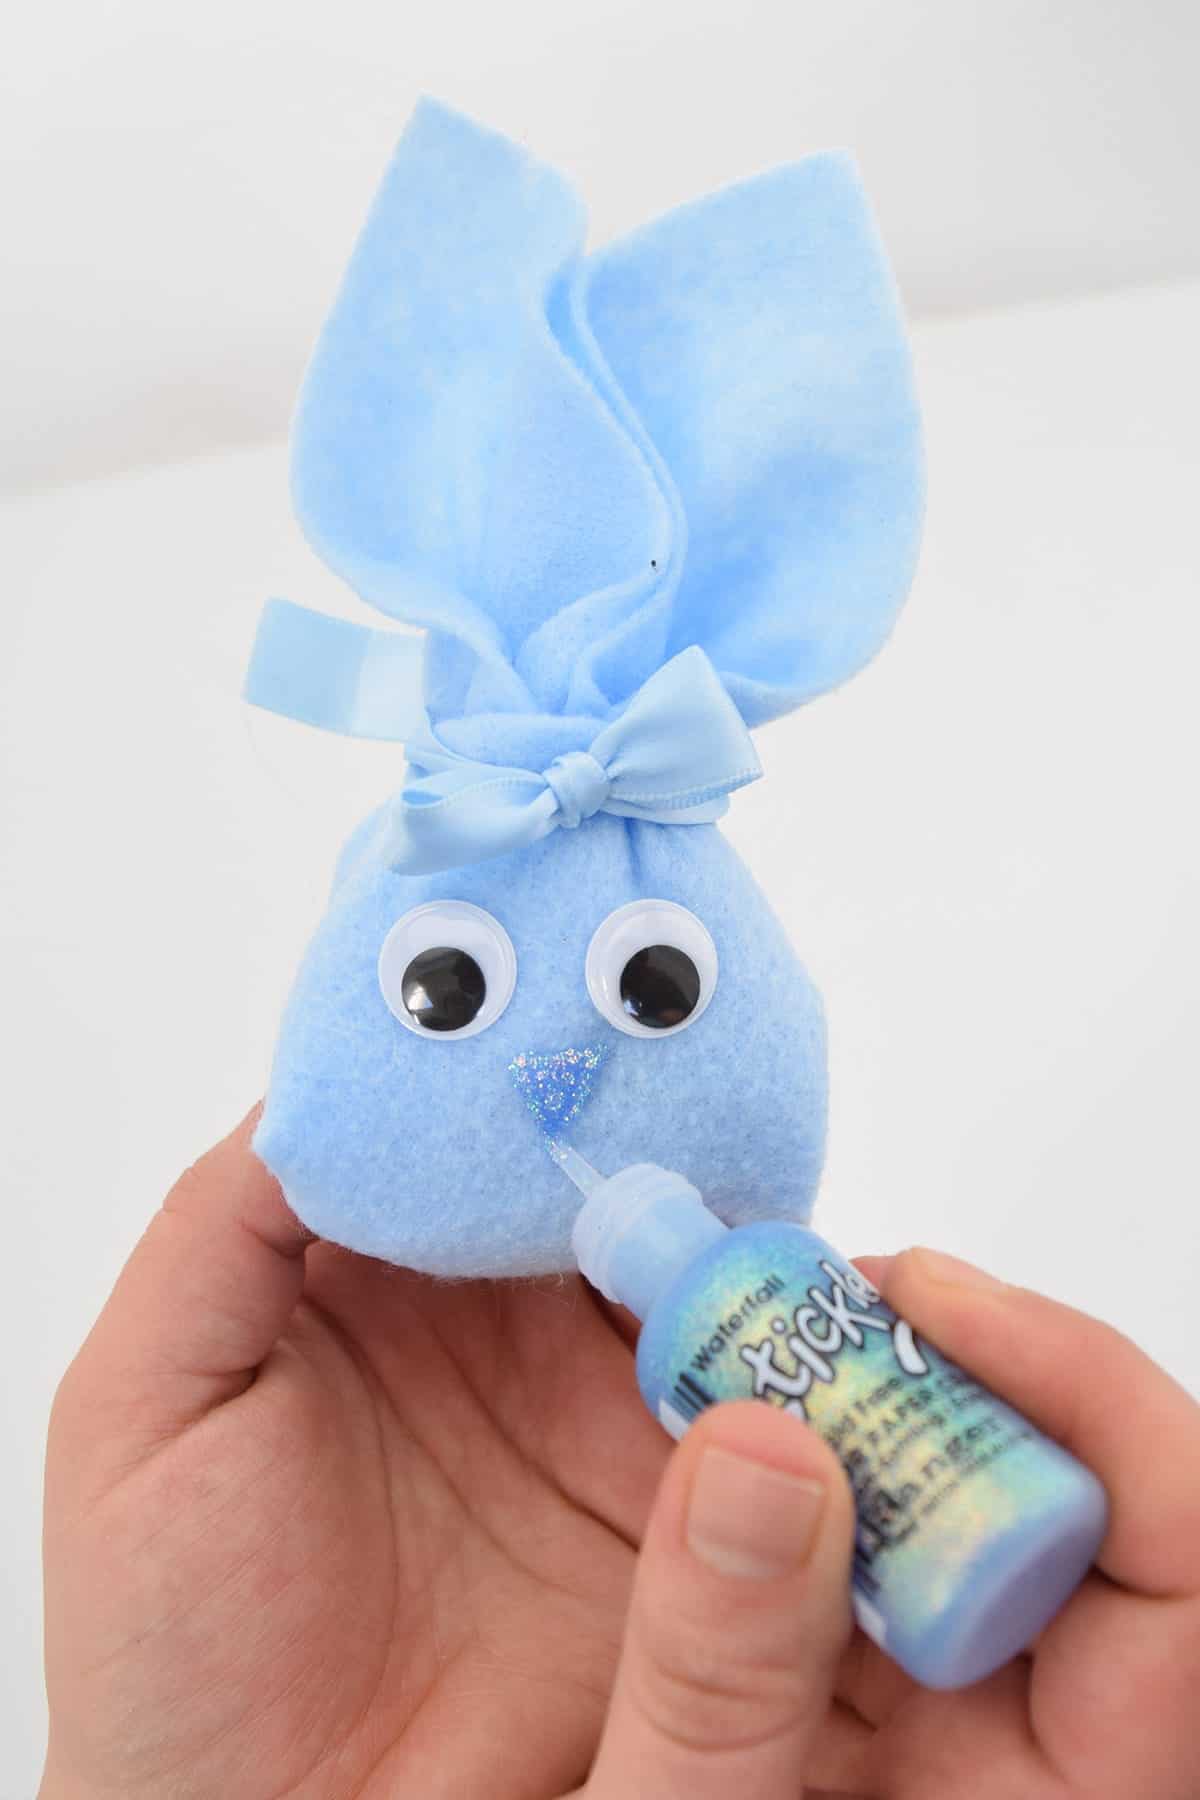
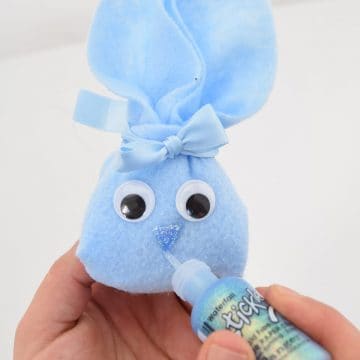
    A super cute face made with googly eyes and glitter glue finishes the project! I use a 3-dimensional glitter glue, so it doesn’t absorb into the fabric. Start to finish in less than 15 minutes so it makes a great craft for kids.

    More Spring Crafts You Might Enjoy

    • Soda Bottle Animal Planters
    • Rose Lavender Bath Bombs
    • Spring Hoop Wreath
    • DIY Self-watering Planters
    • Yummy Marshmallow Pops
    Pink DIY felt bunny pouch with googly eyes on white plate.
    Easter Bunny Napkins

    Oh, and one last thing. If this is going to a child, might I suggest wrapping the loose candy in a small baggy or it will most likely end up all over your floor. That wouldn’t be fun. And these bunnies are all about the fun!

    Weekend DIY project. A pegboard organizer in the craft room above the desk workspace.

    Grab our free series "Weekend Home Projects that will Transform Your Life"

    Sign up below to receive updates including free printables, organization tips, home improvement projects, recipes and more!

    Spring Crafts Tutorials

    • These recycled plastic bottle planters are so adorable and can be self watering planters . They are perfect for a cactus or succulent!
      Recycled Plastic Bottle Planters Craft
    • Spring hoop wreath closeup with peonies, roses, and lamb's ear.
      DIY Embroidery Hoop Wreath
    • Three DIY Windmills craft on white backgroubd.
      How To Make Paper Windmills
    • Blue front door on red brick house with planters on either side.
      Small Front Porch Decorating Ideas

    PS I love seeing your creations! Be sure to take a photo and tag #cravingcreative on Instagram! You can also stay in touch with me through following me on Instagram, Pinterest, and subscribing to the newsletter!

    DIY blue felt bunny pouch with googly eyes held in hand painting glitter nose and mouth on front.

    Easy Easter Bunny Pouch Craft

    Similar to fabric origami or napkin folding, this Easter bunny craft is super easy and takes less than 15 minutes to make. Great craft project for kids, parties, or Spring and Easter crafts.
    5 from 1 vote
    Print Pin Rate
    Project Time: 10 minutes minutes
    Total Time: 10 minutes minutes
    Author: Rachel
    Cost: $5

    Tools

    • 1 Rubber Band

    Supplies

    • 1 A square piece of fabric such as 8×8 piece of felt. A square napkin may work too.
    • Candy or other small filler
    • 2 Googly Eyes
    • 1 Ribbon
    • Glitter Glue

    Instructions

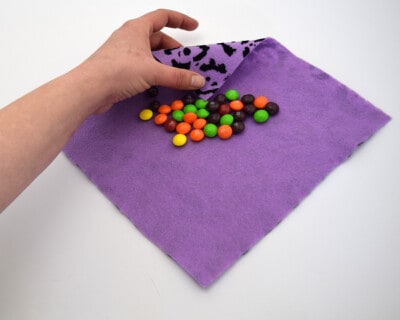
    • Lay a square piece of felt out flat. Put a small toy or handful of candy in the center if you choose.
      Napkin laying flat with candy in the center.
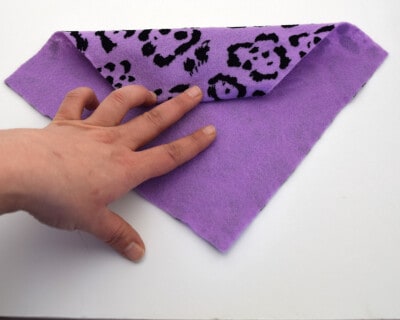
    • Fold the top corner down halfway, to the center.
      View of hand folding a purple felt square full of round colored candies.
    • Fold/Roll the folded end TWO MORE TIMES.
      Closeup of rolling a napkin.
    • Bring the sides together at the back. This will form the ears.
      Napkin origami folding bunny.
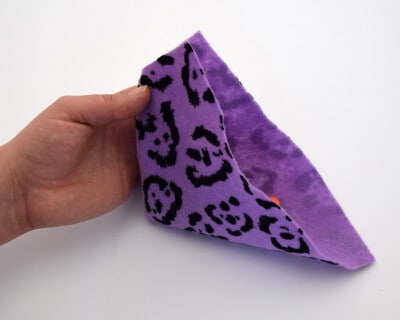
    • Pinch the middle where the base of the ears will be. Adjust ears as necessary.
      Hand holding folded purple felt pouch full of colored candies to create rabbit ear shape.
    • Tuck the corner in and then pinch with the thumb to put in position. The picture may suggest it but I can't do this one-handed. Someone had to hold down the camera button.
      Tucking the center in of napkin to make a face.
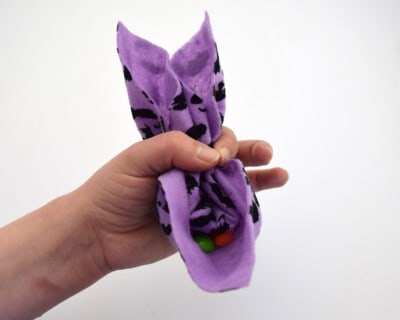
    • Pull the front sides up and back to smooth out the face area. Adjust ears again if necessary.
      Holding a napkin folded bunny pouch up.
    • 8. Secure with a rubber band. The front face area will come just above the rubber band. Tie a ribbon underneath the rubber band, making sure it is tight enough to be secure, but it doesn't have to be super tight. You can gently remove the rubber band or hide it under the ribbon.
      Folded blue felt rabbit pouch with blue ribbon tie.
    • Add the face. You can hot glue the eyes and glitter glue to make the mouth and nose.
      DIY blue felt bunny pouch with googly eyes held in hand painting glitter nose and mouth on front.
    Tried this Project? Tag me Today!Mention @CravingCreative or tag #CravingSomeCreativity!
    « Kitchen Makeover Reveal
    Easy Easter Table Decor Ideas and Centerpieces »

    Comments

      5 from 1 vote (1 rating without comment)

      Leave a Reply Cancel reply

      Your email address will not be published. Required fields are marked *

      Recipe Rating


    1. Holly says

      February 26, 2016 at 11:59 am

      Super, Super Cute!! Holly 🙂

      Reply
    2. Rebecca says

      April 06, 2015 at 8:33 pm

      Yeah your bunnies are all about fun and they are SO CUTE!

      Reply
    3. Kayla says

      March 30, 2015 at 5:52 pm

      Oh my goodness these are so adorable I just love it! I was sold on the idea even before I saw that you put candy in them 🙂

      Reply
      • Rachel says

        March 30, 2015 at 10:26 pm

        haha, that is part of the point since the candy is kind of like a secret. The kids and can play with them and then when they are done with that…bam! candy, lol.

        Reply
      • Rachel says

        March 30, 2015 at 10:26 pm

        haha, that is part of the point since the candy is kind of like a secret. The kids and can play with them and then when they are done with then…bam! candy, lol.

        Reply
    4. Laurie says

      March 26, 2015 at 9:27 am

      Just popping over to let you know that we will be featuring your adorable How to Fold a Felt Bunny on the Brag About It Link Party which goes live Monday at midnight! Congratulations!
      ~Laurie

      Reply
      • Rachel says

        March 30, 2015 at 9:38 pm

        Wow! Thanks so much and I can’t wait to join in again this week!

        Reply
    5. Laurie says

      March 25, 2015 at 4:27 pm

      I know I already commented, but I wanted to say thank you for sharing this cute project with us at VMG206 Brag About it!
      ~Laurie

      Reply
      • Rachel says

        March 26, 2015 at 6:17 am

        Thank you, Laurie! Your comments are always appreciated. I was happy to have a few great projects this week! Have a great day!

        Reply
    6. Melissa Vera says

      March 24, 2015 at 9:36 am

      These are just to cute for words. Thank you for showing us how to make such cute bunny. #HomeMattersParty

      Reply
    7. Brittanie @Simplistically Living says

      March 20, 2015 at 11:46 pm

      These are so cute and look fairly simple to make. I am sure my son is going to love them! Visiting from the Spring Craft Blog Hop Linky Party!

      Reply
      • Rachel says

        March 23, 2015 at 12:22 pm

        It took me a few times to get it down but after the first one, it was so easy and fast! The only tricky part was figuring out how to get the front fold to look like a face. That’s why I took such detailed pictures. My son loves them too!

        Reply
    8. Small Talk Mama says

      March 20, 2015 at 11:39 am

      So super cute!! Everyone is my family is getting one for Easter this year. Thanks for sharing!!

      Reply
      • Rachel says

        March 23, 2015 at 12:17 pm

        Thank so much! I know everyone will love them, especially at Easter!

        Reply
    9. All that's Jas says

      March 19, 2015 at 3:27 pm

      OMG, they are super cute! I’m so glad you linked it with us at Thursday Favorite Things! XO

      Reply
    10. Laurie says

      March 18, 2015 at 4:17 pm

      So cute!! Love them! and Pinning!
      Happy to be co-hosting the #SCBH2015 with you!
      ~Laurie

      Reply
    11. Creative Mama REnee says

      March 18, 2015 at 3:58 pm

      These are super cute, I wonder if you could wrap a plastic egg full of candy in them, that would be so much cuter than just plastic eggs in a basket. Going to try to encorporate this into the kiddo’s Easter basket this year! I love co-hosting the Spring Craft Blog Hop with you! #SCBH2015

      Reply
      • Rachel says

        March 23, 2015 at 12:30 pm

        I think it would be fine, especially if you used a slightly larger piece of square felt. I have small hands but I used about a handful of candies in mine which were 8×8. A plastic egg might even make the face a bit more like a real rabbit because of the shape.

        Reply
    12. Beverly says

      March 18, 2015 at 10:56 am

      Adorable! These are so sweet! I love the nose and mouth done with the glitter glue.

      Reply
    13. Theresa (Tee) says

      March 18, 2015 at 8:49 am

      Hi Rachel, these bunny pouches are too sweet! Grown ups and kids alike would love seeing this at the table. Thanks for sharing the tutorial. Cohosting #SCBH2015.

      Reply
      • Rachel says

        March 23, 2015 at 12:27 pm

        Thanks Theresa! These bunnies are so cute and kind of versatile since I also used them to decorate the Easter table.

        Reply
    14. Christie says

      March 18, 2015 at 7:11 am

      These bunnies are so cute! I am sharing! 🙂 It’s great co-hosting the Spring Craft Blog Hop with you! #SCBH2015

      Reply
    15. Erlene says

      March 18, 2015 at 1:23 am

      Super cute and I know the kids will love the treats inside.

      Reply
    Newer Comments »
    Headshot of Rachel Beach, the author of Craving Some Creativity.

    Hi, I'm Rachel!

    Creativity makes me energized and fearless. My husband and I have been renovating homes for over a decade and love to share our passion for all things home. Follow along for remodeling tutorials, recipes, and entertaining ideas sure to inspire!

    More about me →


    Popular Projects

    • Collage of large outdoor Halloween decorations you can make yourself like skeletons, spiders, and pumpkins.
      30 Large DIY Halloween Outdoor Decorations
    • Blue front door on red brick house with planters on either side.
      Small Front Porch Decorating Ideas
    • A basement bar area with brick wall, charcoal gray cabinets, and pool table in a moody color palette.
      How to Create a Cohesive Color Palette (Real Life Step by Step)
    • Cans of paint.
      4 Best Furniture Paints in 2024
    • Behr Midnight blue painted cabinets in a classic old world kitchen with modern white accents and backsplash. Wicker chairs, copper light fixtures, and wood floors add warmth.
      The Best Blue and Navy Kitchen Cabinet Paint Colors
    • Two DIY witches with glowing heads standing near a cauldron filled with skulls.
      DIY Outdoor Halloween Witches

    Featured On

    Collection of Expert Features including Better Homes and Gardens Magazine, Apartment Therapy, Angie's List, This Old House Magazine, The Huffington Post, Delish, Wayfair, and Real Simple Magazine.

    Most Popular Recipes

    • Ricotta Stuffed Shells with Sausage makes an easy italian meal for the whole family!
      The BEST Sausage Stuffed Shells Recipe
    • Hibachi Chicken and Shrimp on a plate with yum yum sauce in the center.
      How to Make Hibachi
    • Squash casserole with ritz cracker toping as a side dish served on a stack of plates.
      Squash Casserole with Ritz Crackers
    • Beef Cannelloni
    • A large pot of beef and rice soup with vegetables and a wooden spoon.
      Beef and Rice Soup
    • Restaurant style Mexican white Cheese Dip with pico de gallo topping in wooden bowl on dish cloth with chips.
      Mexican White Cheese Dip {Queso Blanco}

    Fall Favorites

    • Crockpot lasagna soup in a bowl with ricotta cheese and fresh basil on top.
      Easy Crockpot Lasagna Soup
    • Pumpkin muffins with crumb topping on a cooling rack.
      Pumpkin Cream Cheese Muffins
    • A slice of apple bread pudding with ice cream on top. Background of napkins and a small plate.
      Apple Bread Pudding
    • Two grilled pork chops with grill marks laid out on a wooden background.
      Grilled Maple Glazed Pork Chops
    • Closeup of a fall layer cake with orange frosting and a fork in front of the cake.
      Old-Fashioned Spice Cake with Cream Cheese Frosting
    • Side view of three glasses of caramel apple sangria on a rustic wood board. Cinnamon sticks lay around the glasses with slices of apple and herbs as garnish.
      Caramel Apple Sangria

    Footer

    ↑ back to top

    About

    • Privacy Policy
    • Disclaimer
    • Terms & Conditions
    • Accessibility Policy

    Favorites

    • Blog
    • Shop
    • Our Home

    Contact

    • Contact

    Copyright © 2025 Craving Some Creativity

    Rate This Recipe

    Your vote:


    A rating is required
    A name is required
    An email is required

    Recipe Ratings without Comment

    Something went wrong. Please try again.