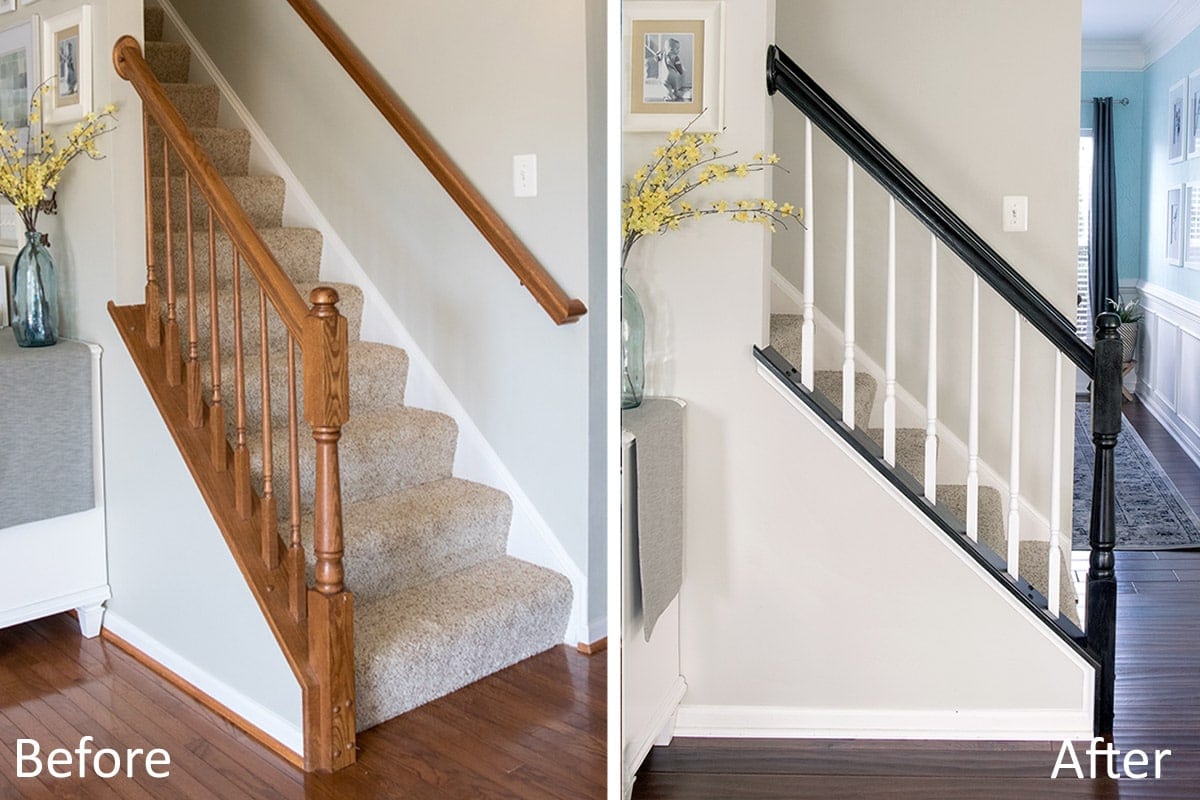
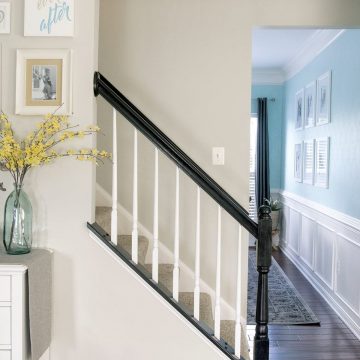
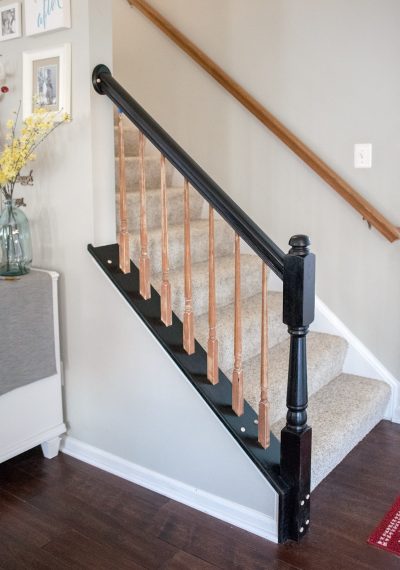
Tired of the look of your stair railings and banister? Learn how to paint stair rails and balusters for an inexpensive upgrade and professional results that can update your home's aesthetic and add significant value.
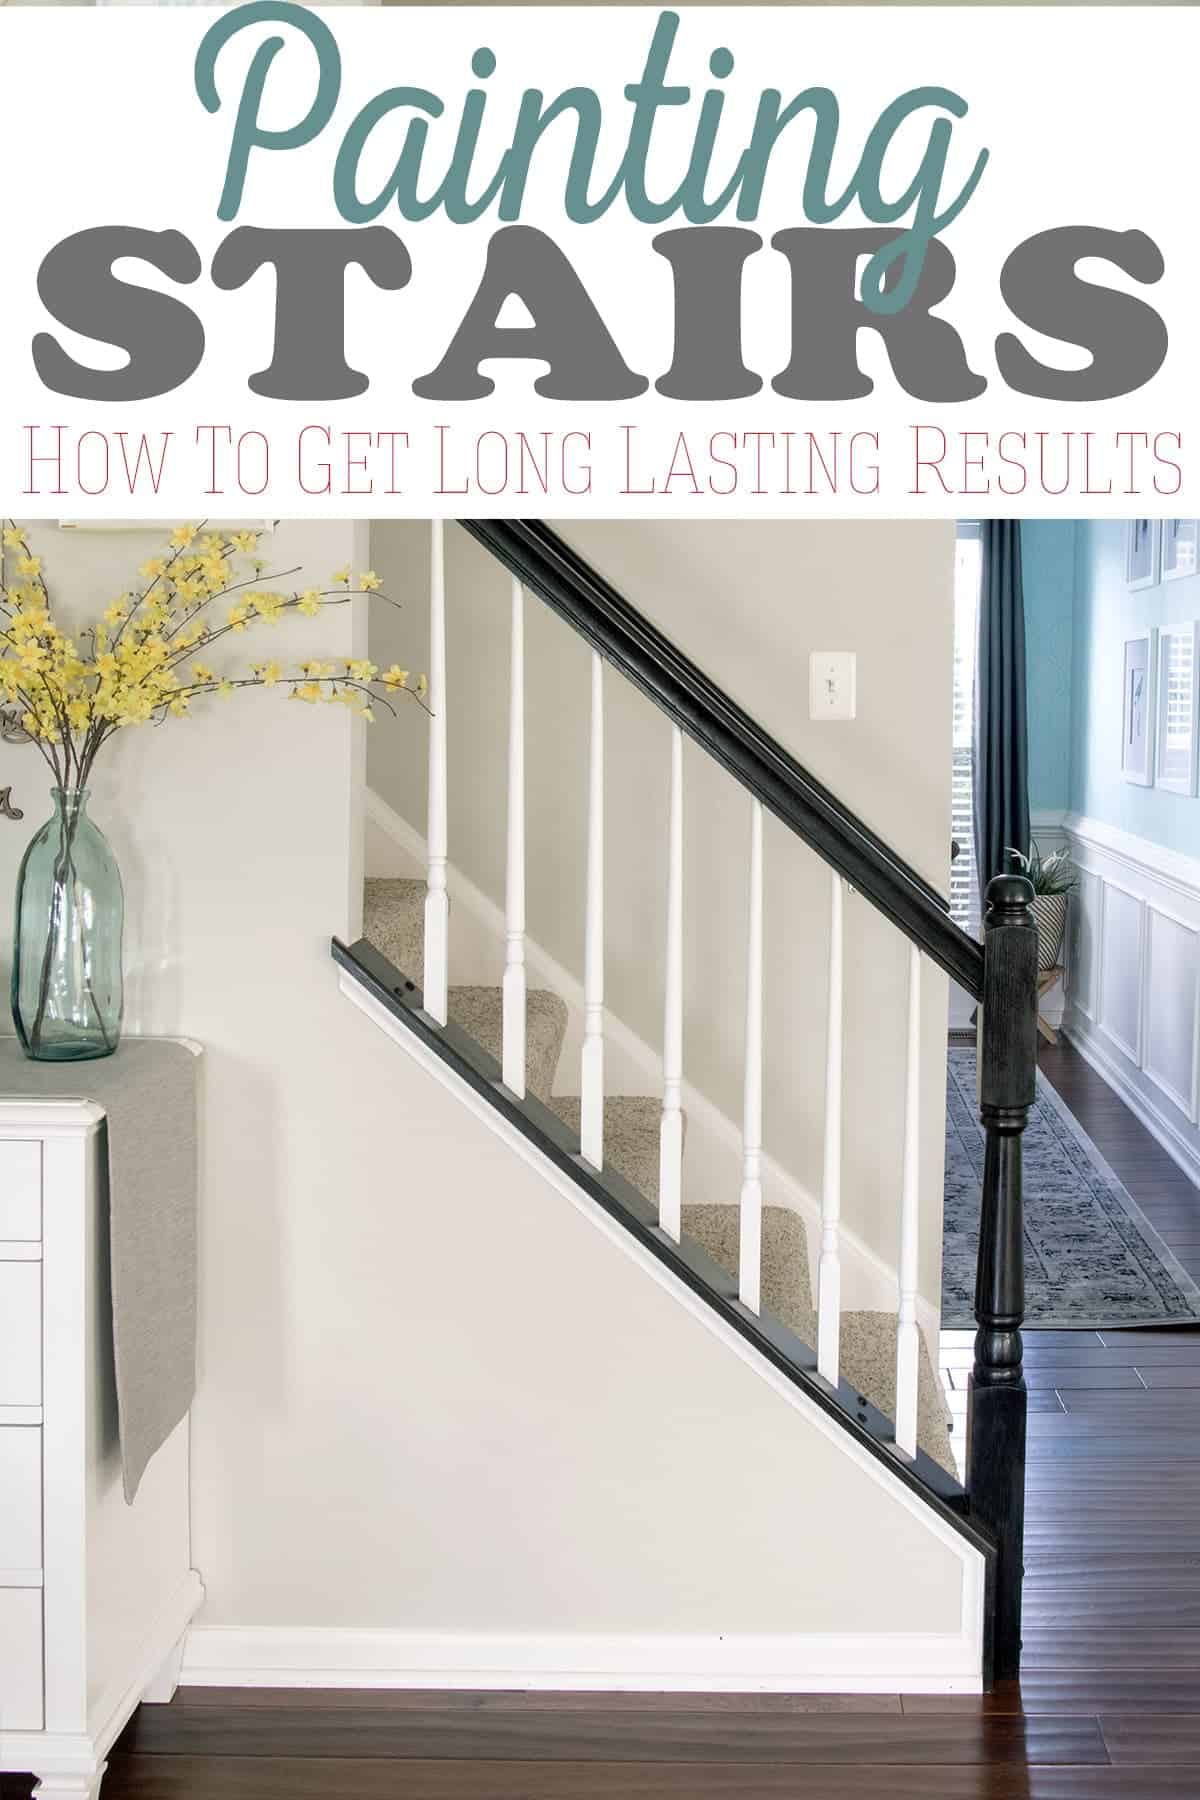
When we installed new hardwood floors, I was shocked at the price of replacing the balusters, railings, and steps. $200 per step and the railings would add several thousand dollars to our project.
That was pretty far outside my budget, so a $50 can of paint looked mighty enticing. Since we have built and stained staircases, painted several high-traffic bathroom cabinets, and are experts at painting makeovers, I knew that painting railings and balusters would be fairly easy.
Even several years later, they look almost brand new. This project is a little different from painting furniture, so I have included a printable tutorial (with photos) at the bottom of this post or read on to get all our tips and tricks!
Recommended Materials and Supplies
Over years of remodeling homes, I have developed my no-fail list of products for painting tricky surfaces:
- TSP or Degreaser
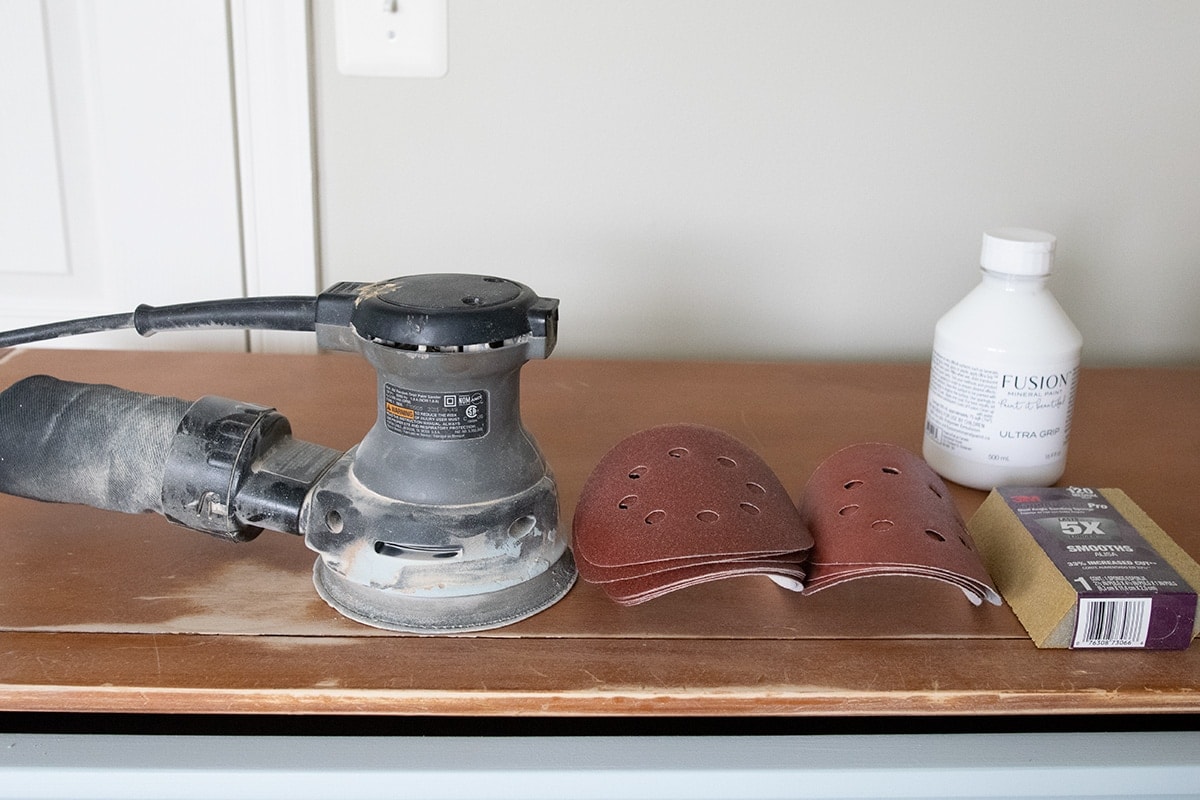
- Orbital Palm Sander with 120 or 220-grit sandpaper
- Sanding blocks – I like the ones with the angled edge.
- Stainblocking Primer – I have used many brands, but Premium or Adhesion is my never-failed-me-ever primer.
- Fine Paintbrushes – A fine furniture paintbrush will give you the best finish.
- Clean, dry lint-free rags
- Wood Filler – Only for imperfections or filling old hardware
- Paint
- Stir Sticks
Paint Recommendations
My go-to paint for handrails is Benjamin Moore Advance. There are some other paints that I would use, however, they are either more expensive (Sherwin Williams Emerald Line and Benjamin Moore Grand Entrance), have mixed reviews even if I haven’t had a problem (Behr Cabinet Paint), or have limited colors (Rustoleum Cabinet Transformations).
Read More>>>> Our thoroughly tested guide to The Best Paint for Furniture.
Pros of these types of paints:
- Durable finish that will last!
- Does not need a topcoat for durability.
- Smooth self-leveling paint.
- Easy to wipe and keep clean (satin or semi-gloss finish)
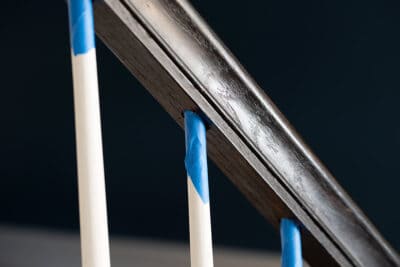
For this particular project, I used the pre-mixed Advance paint. A quart was more than enough for all of our stair railings. Closeup of Satin Black in Benjamin Moore Advance to show finish:

Pro Tip: Stair banisters are high-traffic areas. They will be touched, leaned on, and perhaps a child, like mine, will treat them as a jungle gym. Therefore, I recommend hard enamel-type paint in a satin or semi-gloss finish. Flat or matte paints are generally more likely to blemish and can be harder to clean.
Do I need to sand before painting stair railings?
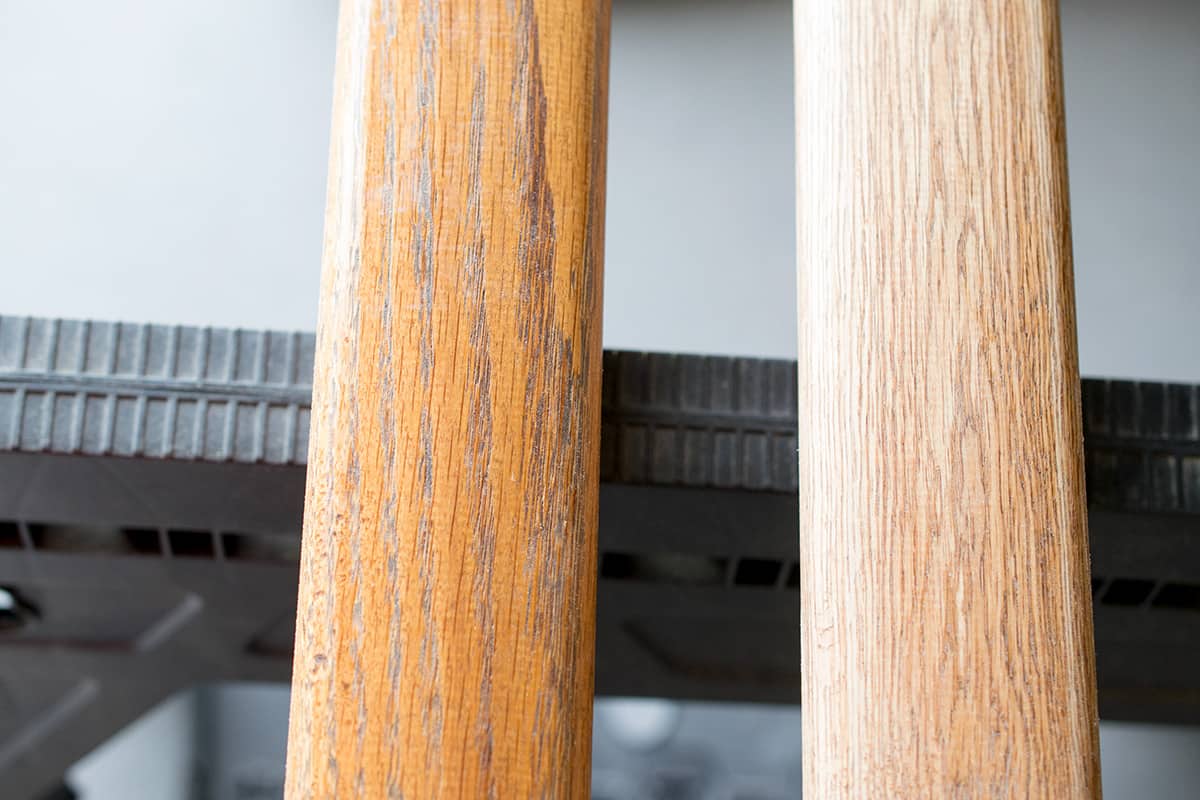
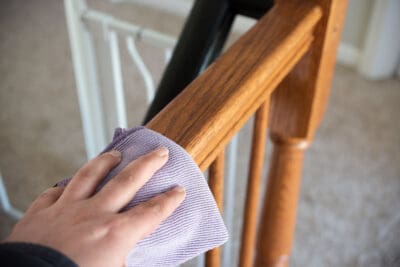
Handrails NEED to be as durable as possible. I recommend that the rails and balusters be sanded to achieve a proper bond. Hand sanding all of this is certainly the worst part of the job, but you really just need to “rough up” the surface.
Tips for sanding stair banisters:
- There is no need to remove all of the previous varnish and stain. Just remove the glossy finish.
- Use 120-grit sandpaper or 80-grit sanding sponges.
- Flat surfaces can be sanded with an orbital sander to make it faster and easier.
- Sand in the direction of the grain, where possible, not across it.
- I usually sand the handrail where people grab the most a little extra.
Does wood need to be primed before painting?
Paint plus primer is useless. I recommend a high-quality stain-blocking primer if you have ANY of the following situations:
- Painting unfinished or raw wood.
- Almost any paint except Chalk paint, Fusion Mineral Paint, or Benjamin Moore Advance (but only if none of the other reasons in this list are present)
- Painting over dark surfaces (i.e. navy or black) with a light or white color.
- Bad stains like deeply embedded oil or markers.
- Rails with knots in the wood such as knotty pine. <- This is uncommon.
However, 1 coat of primer is all you need for good coverage and sealing. After using many, many primers, this series of Kilz is my never-fail go-to primer.
Tips for the Best Paint Finish
- The best paint for painting railings, in my experience, is Benjamin Moore Advance. Unless you have raw wood, it doesn’t require priming! It levels beautifully without brush strokes.
- These are my Favorite Brushes that are soft and don’t leave brush strokes. You can get smaller ones like these paint brushes at Michael’s craft store for under $10.
- Use a one-inch brush to paint details. This makes the paint even, stroke-free, and less likely to drip than a larger brush.
- Sand and paint in the direction of the grain.
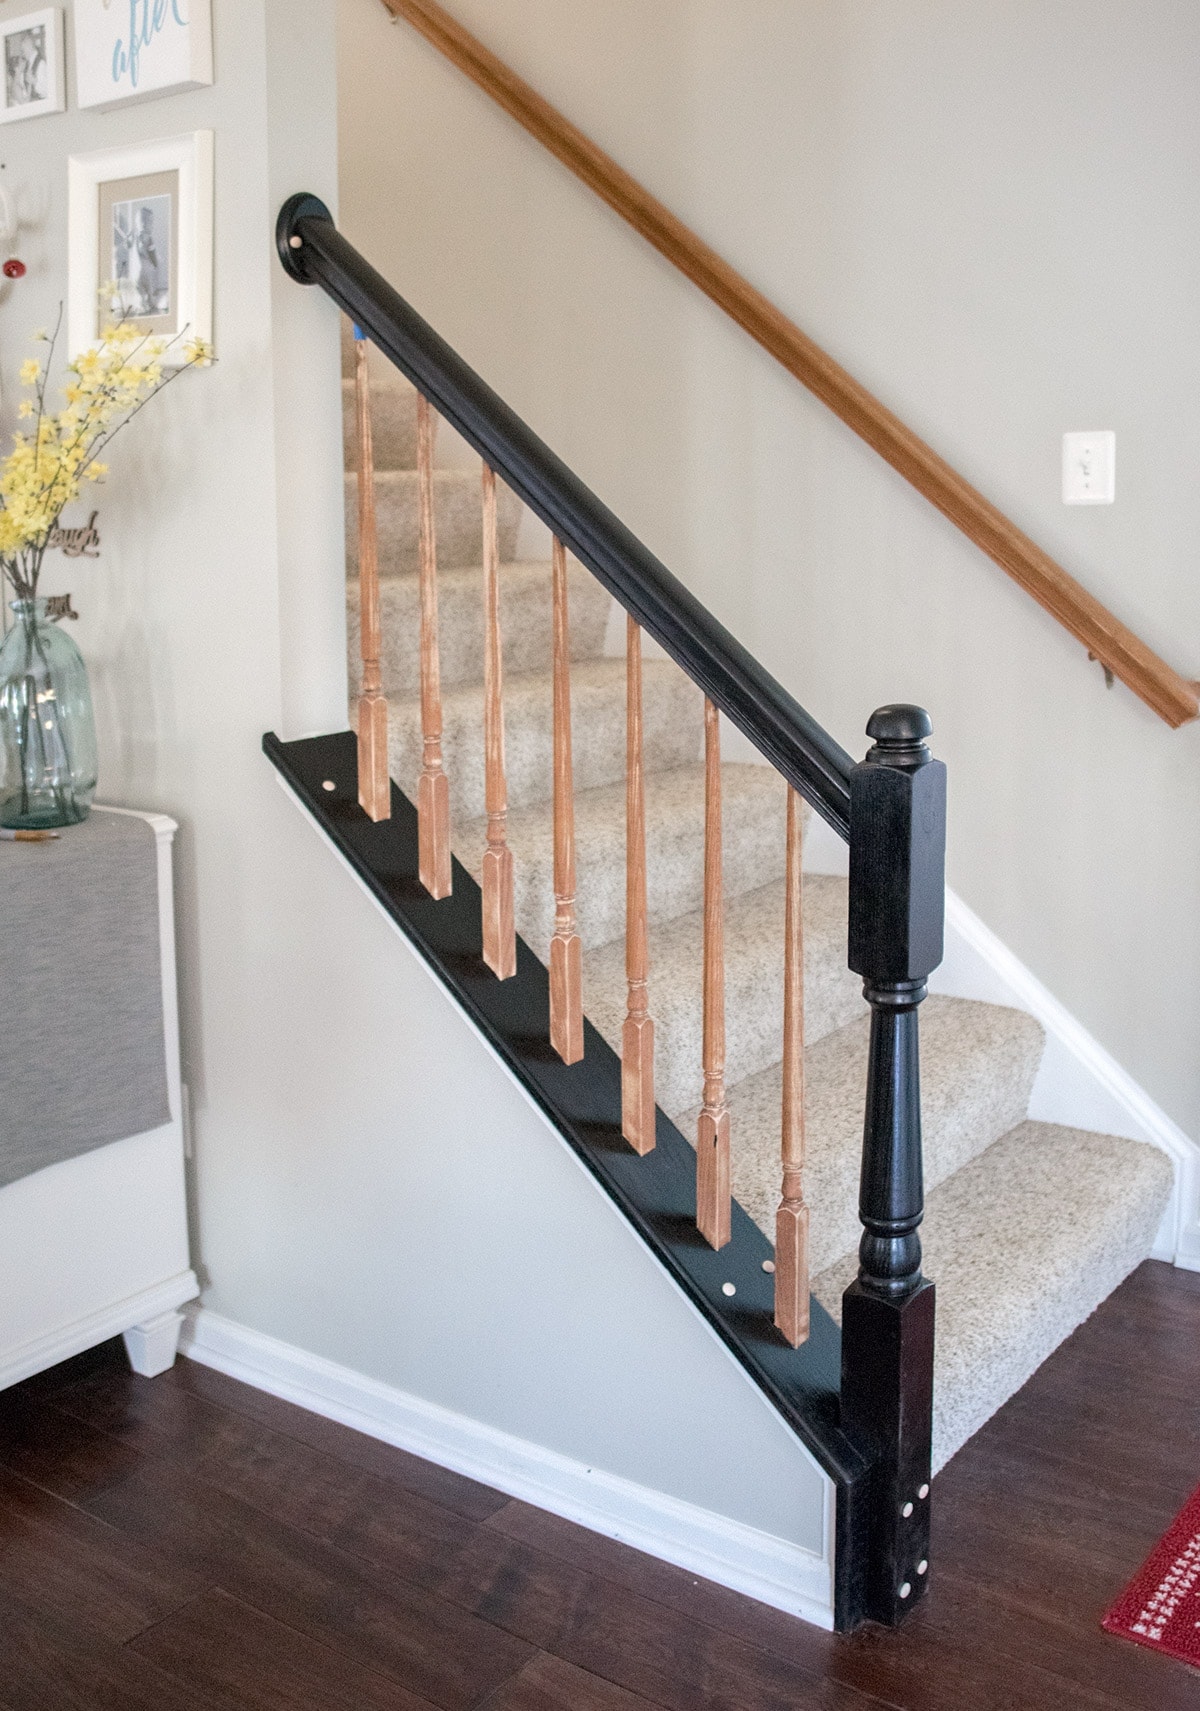
- Always tape off areas you don’t want to paint. It’s faster, easier, and looks much more professional no matter how steady the hand.
More Easy Home Improvement Ideas
- How To Paint Wood Furniture
- How to Paint Concrete
- How to Get Beautiful Baseboards
- Easy Kitchen Upgrade with Peel and Stick Tile
- How To Install Wainscoting
Frequently Asked Questions
Everything should be cleaned thoroughly with a degreaser that won’t leave a film. teaspoon works very well, but other readily available cleaners work just as well. Use a microfiber or lint-free rag to remove any dirt, debris, and grime. Tack cloths are ok, but they sometimes leave a film behind.
My go-to paint for handrails is Benjamin Moore Advance. There are some other paints listed in the article that I would use. The most durable paints will be a satin or high-gloss sheen. Do not use flat paint like chalk paint (unless you use a protective topcoat like polyurethane) on a high-traffic piece such as a kitchen table or stair railings.
You can paint or stain a stair railing with durable results if you use a durable topcoat like polyurethane.
Because stair railings are one of the most touched surfaces in a home, it is highly recommended to sand first.
In my experience, BM advance does cure pretty fast. In the dead of winter (low humidity), the Benjamin Moore paint cured in only a few days. However, don’t depend on those results. I pleaded with everyone in the house not to touch the railings for a week until I was sure they would be able to withstand it. True cure time can take up to a month or more if you live in a high-humidity region.
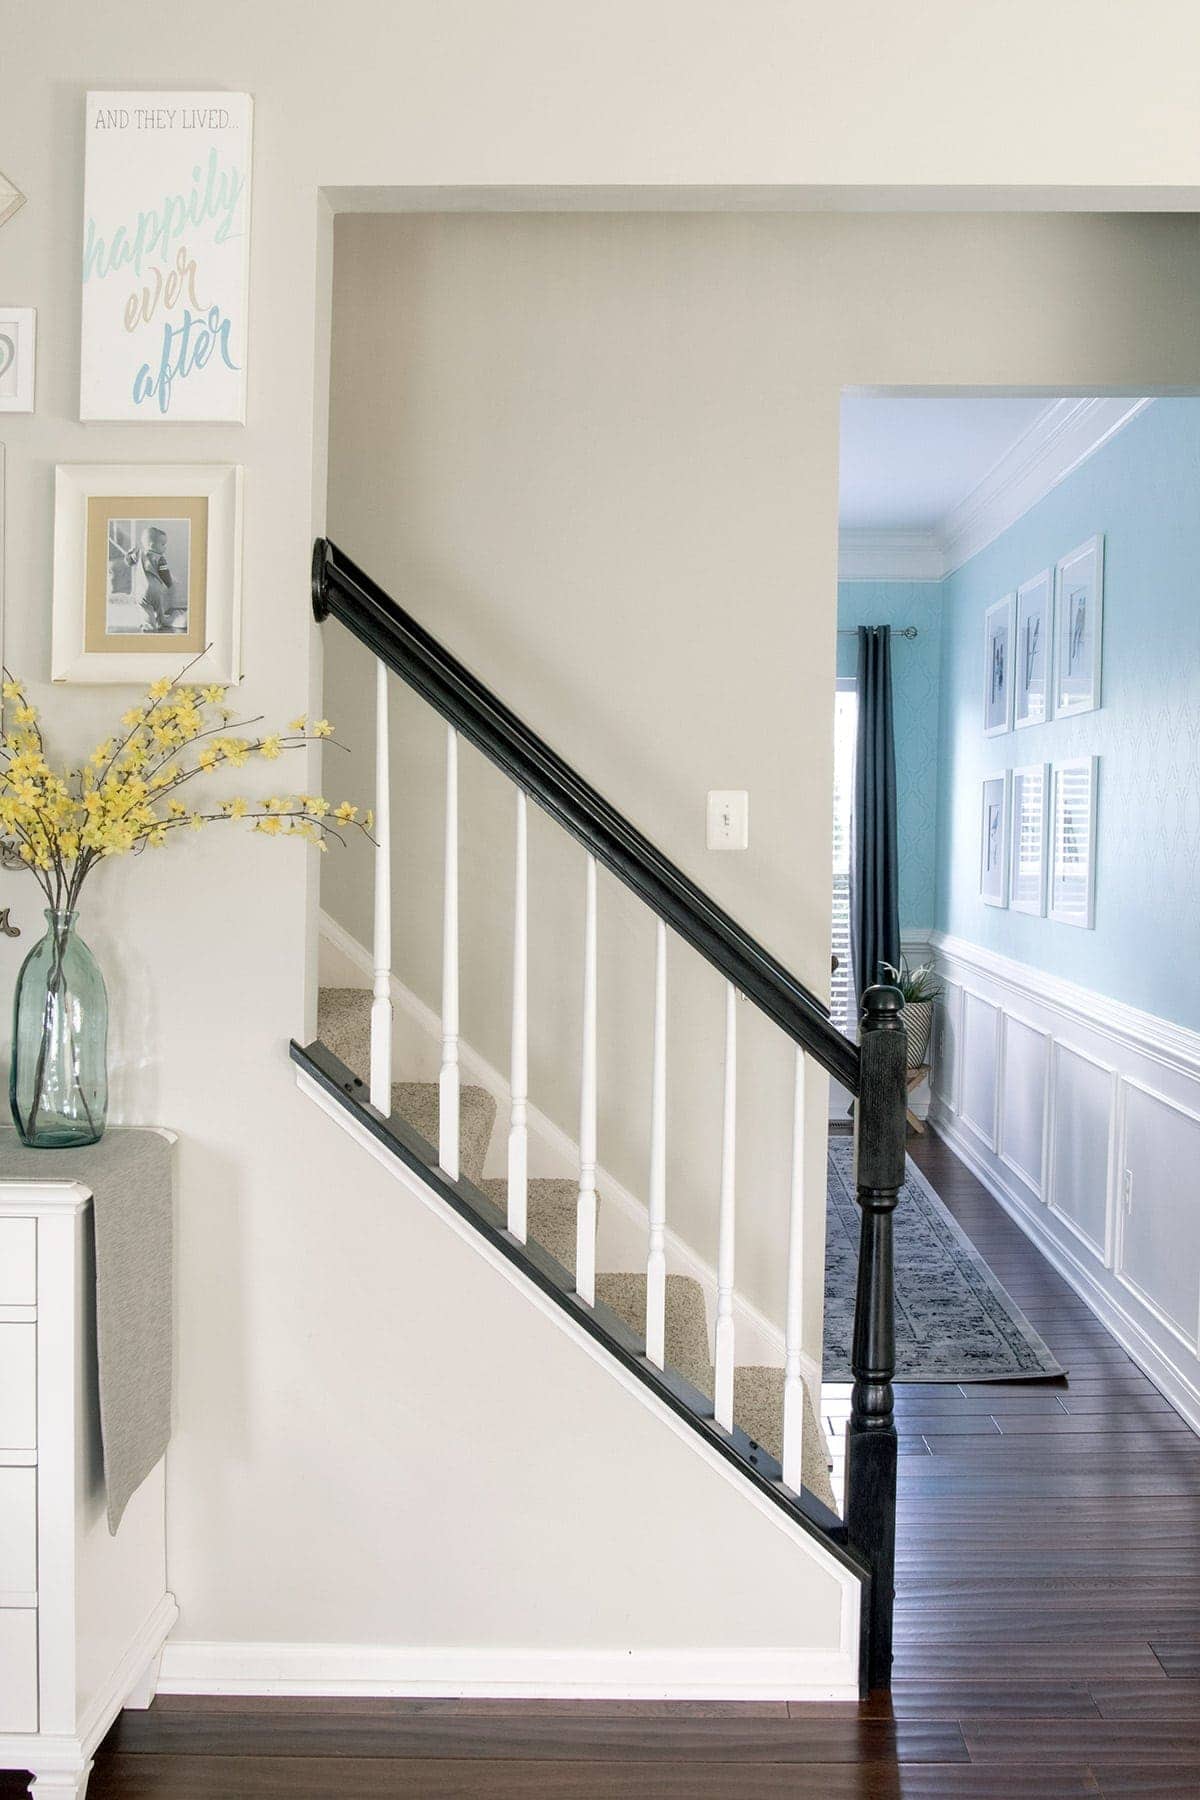
It is too much work to pull out and reinstall stair rails and balusters, so I paint them with a brush. This is why I recommend a good-quality brush to minimize strokes. I detached the single handrail on the right wall because it was rather simple.

Grab our free series "Weekend Home Projects that will Transform Your Life" Sign up below to receive updates including free printables, organization tips, home improvement projects, recipes and more! |
More Furniture and Home Painting Articles
PS I love seeing your creations! Be sure to take a photo and tag #cravingcreative on Instagram! You can also stay in touch with me through following me on Instagram, Pinterest, and subscribing to the newsletter!
How To Paint Stair Railings and Banister
Tools
- Paint Brush
Supplies
- TSP or Degreaser
- Sand paper 120 grit for taking finish off, 220 for smoothing
- Sanding Blocks 80 or 120 grit
- Wood Filler Only for imperfections or filling old hardware
- Painter's tape
- Lint-free Microfiber rollers
- Paint trays
- Stainblocking Primer
- Paint
- Protective Top Coat
Instructions
- Clean surface thoroughly with a degreaser that won't leave a film. Tri-Sodium Phosphate works well, as do most commercially available cleaners. Repair scratches with wood filler.
- Sand any glossy varnish or coating off. Sand a little extra on the hand rail, but otherwise you do not need to sand every bit of previous stain or paint off if it is in good condition. Use an orbital sander with 120 grit on all flat surfaces to make this much easier. Spindles will need to be hand sanded with 80 grit sponge or 120 grit sandpaper. Vacuum and wipe all dust off of the panels before priming.

- Tape around surfaces to prevent paint spilling.
- If painting white or light colors, prime the railings with a quality primer. Kilz Premium (not original) is my no-fail primer. 1 coat of primer is sufficient. Allow to dry 24-48 hours.
- Brush 2 coats of paint for full coverage. Brush with the grain and always from one end to the other. If paint starts to dry, don't go back over it.

Notes
- Knots – use a shellac based primer
- Gooey stuff/adhesive – I like Goo Gone for gooey messes, but make sure to clean off with a degreaser afterwards to remove any residue.
- Grease stains – clean with a good degreaser like Simple Green to break up what you can.
- Permanent Marker/food coloring/other – Clean as best you can and then prime at least two coats.
- Get the right tools. A few extra dollars will save you a lot of heartache and frustration. I have a helpful post on painting without brush strokes here. I prefer fine taklon brushes.
- Tape off any edges you don't want painted such as connectors to the wall.
A Boswell says
Thanks for the great tutorial! I have a wooden/metal combo of handrail and spindles. The handrails are currently wooden with a varnish that I plan on following your steps to paint them black. My question is regarding the spindles. They are metal and currently painted white but the paint is chipped and flaking in many spots. I would like to repaint them white. Do I need to completely sand off the paint on the spindles in this case? Or just sand off the areas that are flaking/chipped? Do you have recommendations on what sandpaper grit to use? Once they are ready to paint, should I use a primer if the metal is dark? If so, do you wave a recommendation for the primer for metal (Kilz?) and paint to use (BM Advance?)? Thank you!!!
Rachel says
No, you don’t need to completely sand off the spindles. You just need to get any loose or flaking paint and then make it relatively smooth. Otherwise, you will see the edges of where the paint flaked off. I would start with a lower grit like 100, but don’t put a lot of pressure into the sandpaper. Let it grab the flaking paint, then work up to 220/320 to get it smooth.
Also, metal is a little different to paint than wood. If you do sand it down to bare metal, even in spots, you will have to prime those with a bare metal primer. Preferably a rust preventative one. I would also recommend a paint for metal specifically, or an enamel paint. This antique trunk I painted has some useful information related to metal.
Lacy Craig says
I have a few spots on my railings that are bare wood (from where I removed trim that I’m not replacing) – you mentioned not needing a primer unless there is bare wood.
A – what primer should I use?
and
B – should I prime the entire rail or can I just get away with priming the areas where the wood is bare?
Rachel says
You can get away with just priming the areas that are bare wood. However, touchups can be difficult to match up to the rest of the paint because the edges will show a line where you removed the old trim. I would sand lightly on that edge area to smooth it out and maybe a very light sanding overall. And then blending in the primer and paint everything.
Jenny says
Hello Rachel,
Good morning!
What color name you used for Spindles?
Best, Jenny
Rachel says
My Benjamin Moore store carries a pre-made white, and black quart sized cans. It doesn’t really have a color, I think.
Jenny says
Hi Rachel,
I liked the bright white color you used in your project. So I just need to buy the pre-make white color from Benjamin Moore? Just to confirm.
Thank you so much for your time and advise.
Best, Jenny
Jenny says
Hello Rachel,
Is your black color a pre-made from Benjamin Moore store? What do you mean Closeup of Satin Black?
Many thanks,
Jenny
Rachel says
Yes, in this example, the black is a pre-made quart from my local store that is simply labeled “Black” and is a satin sheen. A pre-made is nice because it is quite difficult (not impossible at all though) to get a true “black” mixed properly. The photo below that phrase is a closeup of the paint job to show the texture and sheen of the paint, because sheens vary between brands. For example, I find satin sheen in Valspar to have more shine than Behr paints, so I include closeups for that purpose.
Jenny says
Hello Rachel,
Thank you so much for your advice and recommendation on ‘HOW TO PAINT STAIR RAILINGS’.
Please help me with my questions below:
1. If I use coats of Benjamin Moore Advance paint, do I still need a Protective Top Coat?
2. if use BM advance paint, can you still see wood grain texture after the 2 coats?
I like to see these texture.
3. My wood staircase color is cherry brown(not dark brown) mixed color. Can I use still use black or dark brown for stair railing?
Best regards. Jenny
Rachel says
Whether you NEED a protective top coat if you use benjamin moore advance is really up to your lifestyle and how hard you or your family is on that surface. I would never dream of painting kitchen cabinets without a topcoat, for example. While I will always say that a poly is going to be more durable and long lasting, I have several thoroughly used pieces like a bathroom cabinet that have held up well. However, I use no chemical cleaners in my home at all and I don’t scrub them. The paint is directly exposed so it can be easier to remove.
No paint can fill in woodgrain texture on oak. You will always see it unless you fill them which is a completely different process.
To answer your other comment, primer naturally comes in bright white. Painting black over white, and vice versa, usually requires many, many coats to get even color. Having the primer tinted can help that. The original stain color won’t make any difference and black or dark brown is fine. The bonus in painting them darker (unlike painting them white) is that you shouldn’t have to worry if the previous stain will leech through and change the color. That does happen with white sometimes, especially if you don’t use a stainblocking primer.
Helene says
If I use a paint I already have..could I use a lacker over
the paint to protect the paint
Rachel says
I don’t know what paint you have to know if that will work specifically, because many paints won’t bond well enough to a project like this to last. A poly or other topcoat protects the finish and may make it easier to clean but won’t prevent chips, peeling, or scratches if the paint isn’t well bonded or durable enough. I have only ever used lacquer to keep brass or copper from tarnishing, not as a paint topcoat.
TammyJ says
Hi! I hope you see this! Did you only use Kilz on the wood you painted white and just used the black on the wood directly without Kilz? I’ve sanded all wood and getting ready to paint! Your makeover is fantastic and inspiring! Thanks!
Rachel says
I admit that I only used kilz with the white surface, but I generally would recommend the kilz if you can get it dark. At the time, I only had a can of white kilz, which would have made painting black over top much more difficult.
Beth Ashworth says
Did you change out the hardware on the handrail attached to the wall?
Rachel says
We did change the hardware, but I think we only did that for aesthetic reasons. We changed it from a cheap set that was a gold color to a stainless steel or silver color.
Nikki says
What color did you paint the handrail on the wall?
Rachel says
It is also black.
Nicole says
Love the way this looks! Did you remove the railing on the wall when you painted it or did you leave it attached? I’m trying to figure out how to give it even coverage. Thanks!
Rachel says
Yes, I removed the one attached to the wall because I couldn’t paint the inside without doing so. I left the other side with the white balusters in place to sand and paint.
Jennifer says
What colour of white paint did you use in this particular project?
Thank you
Lauri says
I love the colors you chose. I agree that BM Advance is amazing paint! I am painting our basement stairwell walls & trim white, replacing the carpet with a blue/gray, and not sure what to do with the handrail. The stairwell has medium brown wooden doors at the top and bottom which I don’t plan to paint. The handrail is also brown wood, but I would love to paint it. Do you have any color suggestions?
Rachel says
You don’t have to stick to the same color as the wood. You can use a white to brighten it or maybe even the same color as the trim or the walls in your house. Those are usually my go-tos because I must have liked those colors to use them.
Barbara says
Hi! Love the banister! I am going to do the same, so thank you!! What color paint did you use on your walls?
Rachel says
Thank you! The wall color is Valspar Oatlands Subtle Taupe.
Kim says
Hi! The railings look great. What color paint did you use? I’m trying to find a nice dark brown and yours looks great
Rachel says
I use a pre-mixed Black in BM Advance. It isn’t a particular shade, just black.
Millicent Estep says
Hi there, I have stripped my wide hand railings in our beach house and used wood filler in some of the gouched areas. The railings have sat for over a year like this, since I am unsure of what products to use. I want to go for a stained look on the wide hand railings. I used just a white paint in the past and it just doesnt seem to work. I planned on the following the steps:
1. Which wood cleaner to remove oils from our hands and dust?
2. Clear Kilz since I want a stained look
3. Which stain would you recommend?
4 Which sealer would you recommend?
Your advice and help is greatly appreciated. Would love to talk.
Your help is greatly appreciated, since is the second time in 8 years that I stripped my railings. Oils from our hands have peeled off the paint where our hands hit the railings.
Rachel says
Paints have changed greatly over the last 8 years and many have increased their durability to equal or above stain + polyurethane. So that is still an option if you like, but it is highly important to get the right products no matter which way you go. Buying a can of wall paint from the local home improvement store definitely results in heartache for a project like this. I will answer your questions in the same order you asked.
1. Any good degreaser that doesn’t leave a residue will work. I have used TSP, simple green, krud kutter, etc and they all work fine. Just make absolutely sure no residue is left as that will soak into any exposed wood. I clean before sanding/stripping.
2. If staining, you don’t need a primer like kilz at all.
3. The only stain I don’t like at all is anything called Gel Stain. I hate how it looks and how it feels. Brands like varathane, sherwin williams, general finishes, and minwax are fine. Finding the color you like best is the harder part. I do like to use a wood conditioner first sometimes, but not always necessary.
4. Check with a particular sealer that it is compatible with stain. Most oil based polyurethane are compatible with stain and some water-borne or water based polyurethanes are but not all. For poly, I really like Bona Floor Poly. It has a beautiful matte option and not too bad to work with and level. Bona Traffic HD has the highest durability and is considered commercial grade which means it’s good enough for busy restaurants and retail stores, so it will certainly hold up in a home. They have a few different products for different types of projects, and different price points.
I hope that helps and feel free to ask any follow up if you need!
Nancy says
I need to use Sherwin Williams paint. I have looked at the Emerald line of paints and am confused as to which one I use. My stair handrails are current stained with a gloss finish and my island is painted with oil-based paint. All of the Emerald paints are latex. Can I use latex paint over these two surfaces if I use the Kilz? Which Emerald do you recommend? The reviews are mixed – any tips?
Rachel says
I completely understand. Sherwin Williams keeps changing and adding new paints and lines (some you have to special order!). The one that I have used on cabinets is the Emerald Urethane. However, I am always trying to test new products. I am currently waiting on a backorder of Sherwood CAB Acrylic Lacquer to try with Insl-x Cabinetcoat (from Home Depot) because I hear great things about it as well.