Make your own glowing Halloween lanterns-weatherproof, flameless, and perfectly spooky for lighting the path to your door!

Every October kicks off my favorite stretch of decorating mayhem-from fall crafts to Christmas sparkle-but let's start with Halloween!
I've always loved the eerie glow of Halloween lanterns, but I wanted something durable enough for the outdoors. A quick trip to the hardware store led to the perfect idea: weather-resistant DIY luminaries that look spooky and cute.
Psst… Check out more inspiration with Halloween decorated Porches, my DIY Outdoor Halloween Witches Project or the big list of Easy Halloween Crafts!
Supplies and Notes
Here is an overview of the supplies and materials you will need to make the luminaries. Links are included for examples.
- White Blank Corrugated Plastic. The kind you use for yard signs.
- Metal Stakes. Ideally, they should fit through the channels in the plastic, but not necessary.
- X-acto knife. A very sharp knife or craft knife.
- Black Paint Make sure it is outdoor rated.
- Stencils and a Cricut Machine (Optional) – I used these jack o’lantern stencils for my pumpkin lanterns.
- Flameless Candles – best if a few inches tall to light up the center of the luminary
- Waterproof Tape. Clear and durable for outdoor use. Packing tape works well.
How To Make Halloween Lanterns Step by Step
Tip for Sizing: For these luminaries, I used white yard signs. The plastic makes them rain resistant, while being inexpensive. I cut the signs in half lengthwise first, so they measured 10×20.
1. Cut the Plastic to Size
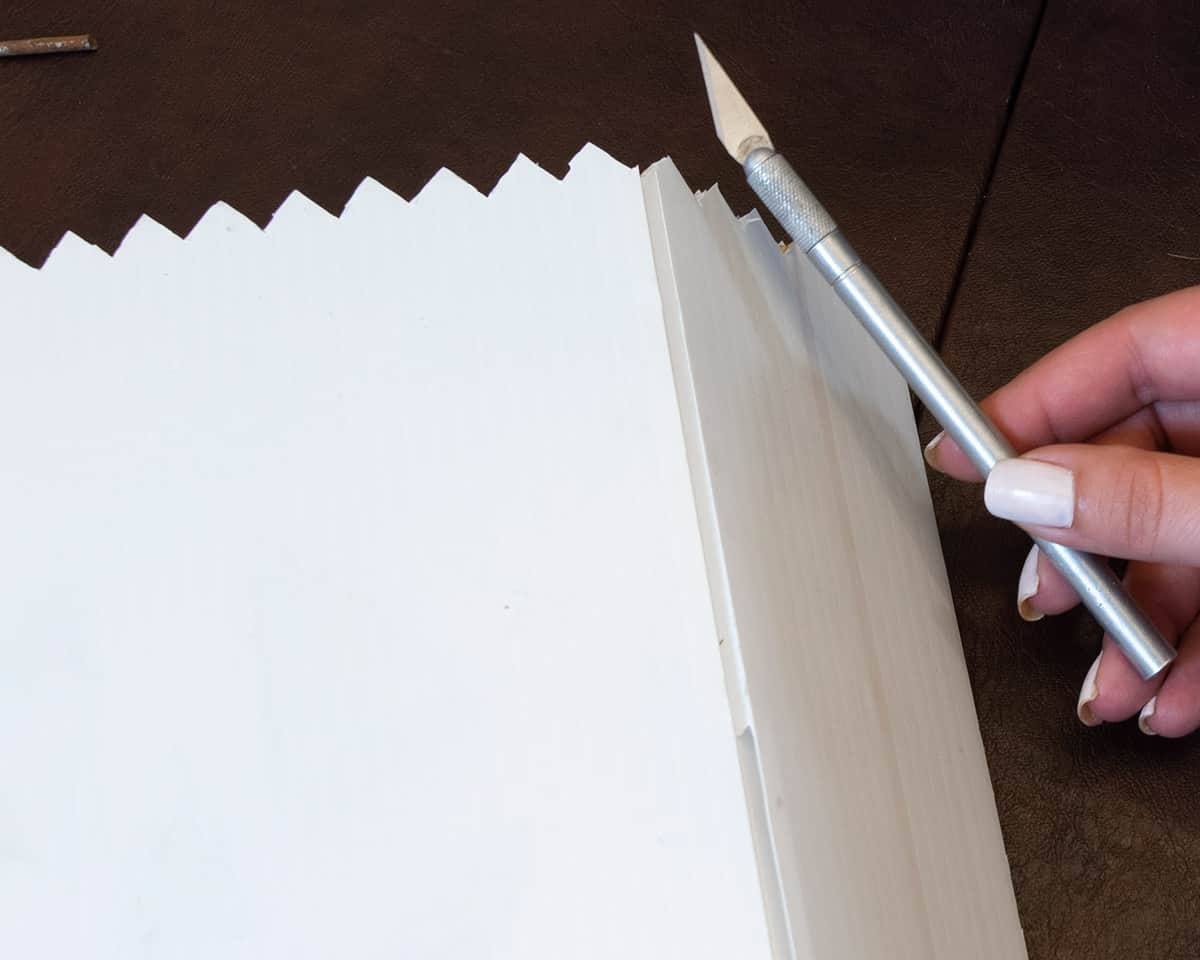
Cut the plastic to the size you want. I used 20×20 yard signs cut in half, so my signs measure 10×20, with the channels being 10 inches and vertical. If desired, cut a decorative edge with an X-acto knife. I cut a razor tooth edging along the top.
2. Cut the Channels to Make a Box Shape
Decide how wide the sides and front/back should be. My boxes have 3-inch sides and 7-inch front/back.
To fold your sides, carefully cut the outer layer of one channel vertically (shown above)- don’t cut through both sides. Don’t tape yet, but you can fold the channels to test your box.
3. Paint Your Design
While you can use a sharpie, waterproof exterior paint will give you the best blackout and sharp lines. A sample can of exterior black paint from the hardware store or a small craft paint bottle is all you need. Allow to dry completely and flatly.
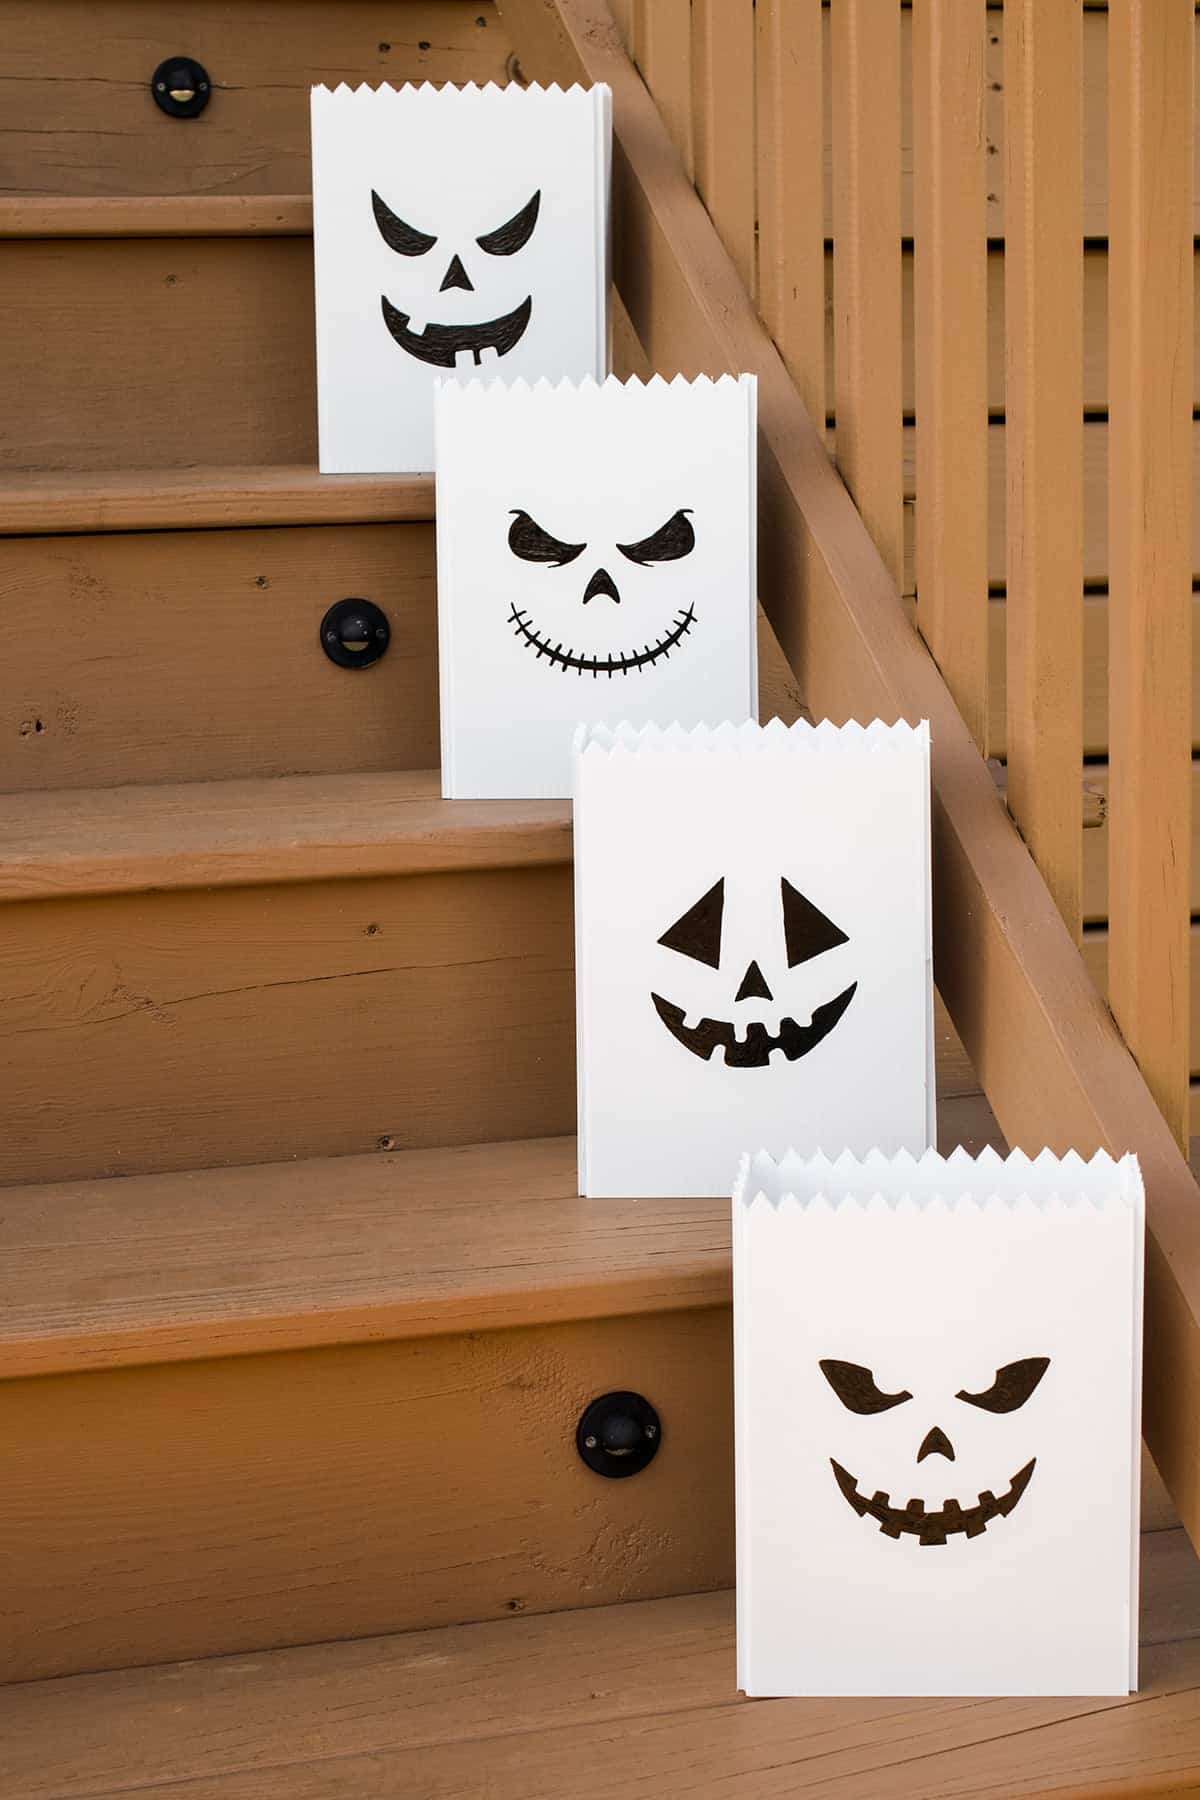
->>>>I used these simple jack-o-lantern patterns one side and “ENTER IF YOU DARE” on the backs.
4. Tape Together Edges.
It’s easier to paint if you haven’t taped the box in place. Bend the vertical channels away from the cut sides so you form a box. Tape the edge with clear tape.
5. Setup Outdoors
Lastly, I couldn’t have these spooky guys flying away on me if a breeze came up! If you buy actual yard signs, you may be able to use the metal “H” stakes that come with them. However, I purchased these wire stakes to secure them in the ground. They are 9-guage steel, the same as the stakes that come with the signs and a perfect fit!
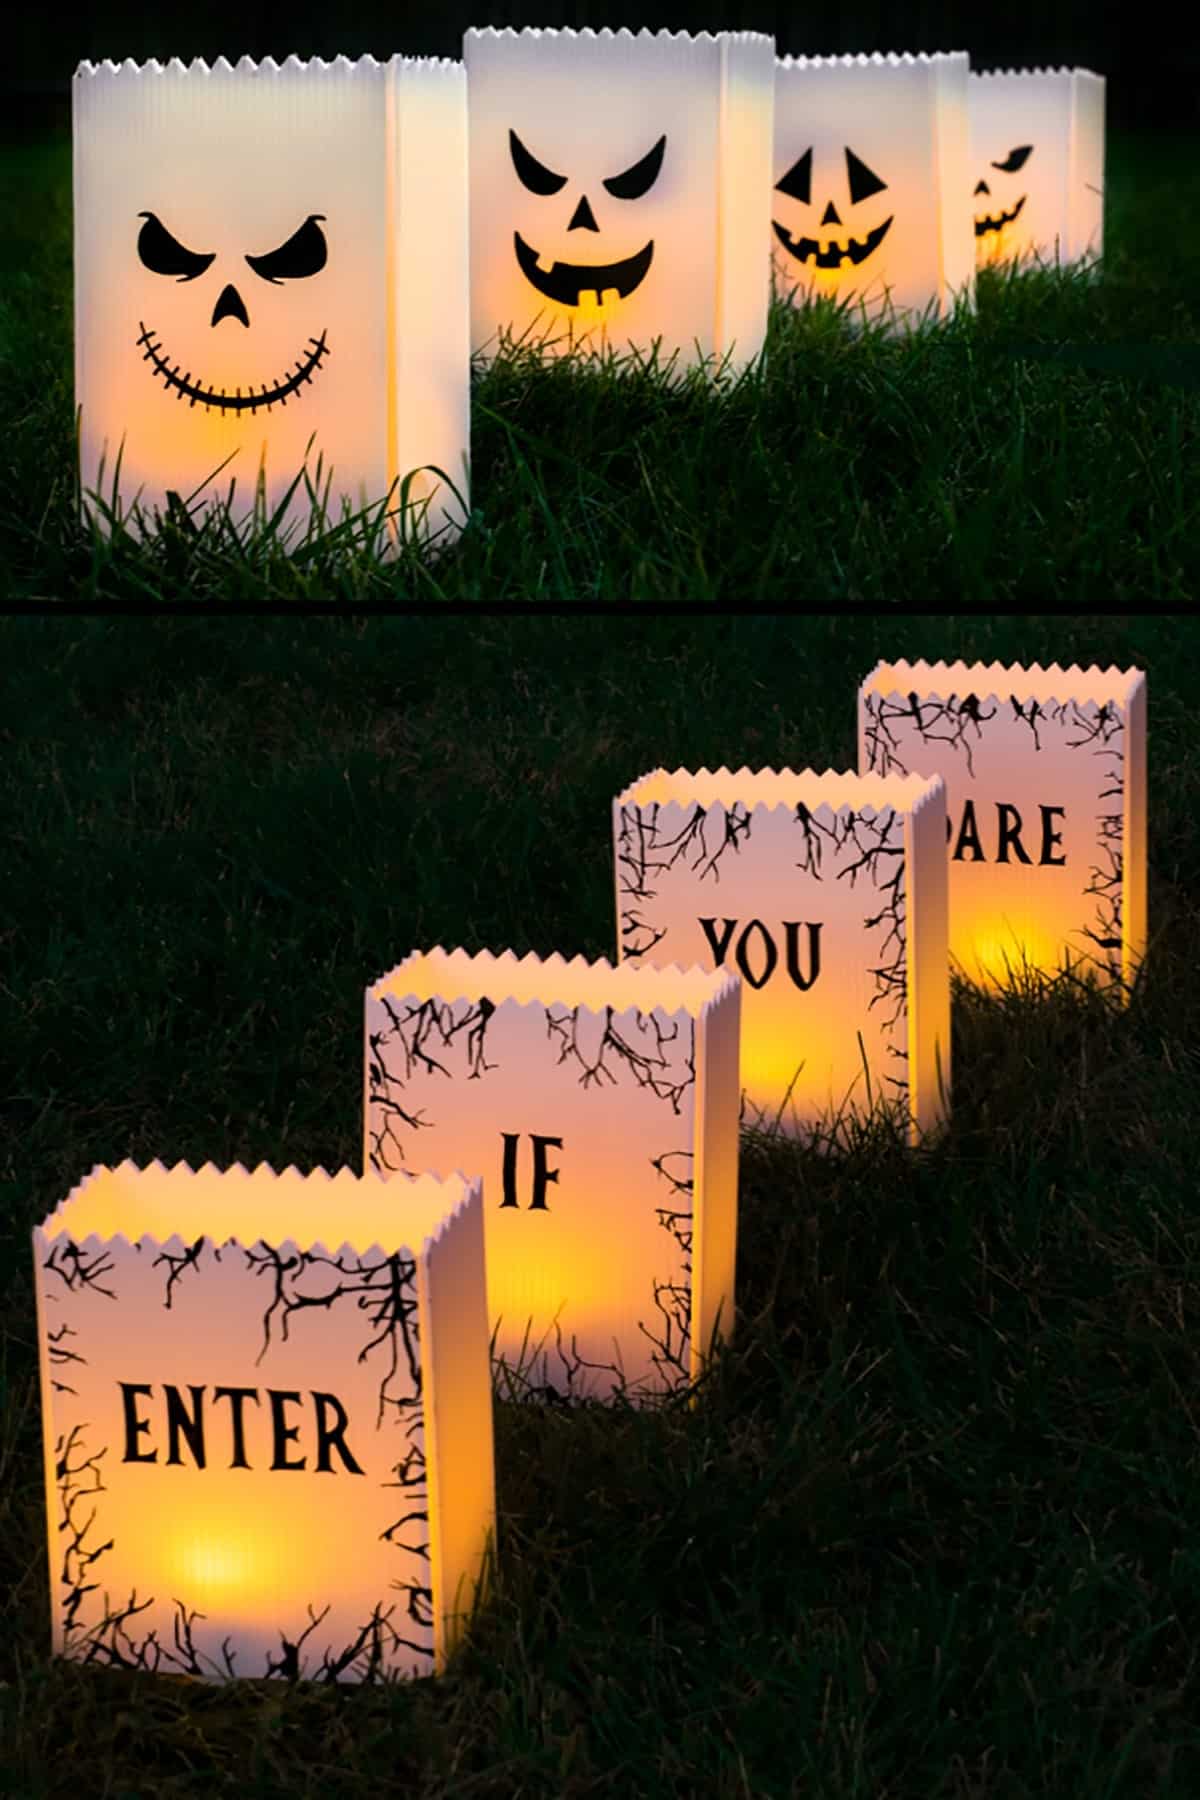
I put 3 flameless candles in each Halloween Lantern to give them a good glow, but you could also use battery powered string lights like these.
Quick Tips
- Instead of corrugated plastic, I have seen milk jugs, plastic jack o’lanterns, and actual glass lanterns used.
- Paint applied in 2-3 layers will give the best blackout for your design. I have not used a sharpie, so I would test first but they are waterproof.
- These hold up great for years. I have used them for 4 years and they are in great shape. They have sat in rain, wind, and heat with no problem.
- Waterproof flameless candles that are a few inches taller work the best. I trim the wax around the top to get maximum glow.
These DIY Halloween lanterns are a fun and easy way to enhance your outdoor decor. With minimal materials and effort, you can create a spooky atmosphere that delights guests and trick-or-treaters alike. Don’t forget to check out our other Halloween projects for more inspiration!

Grab our free series "Weekend Home Projects that will Transform Your Life" Sign up below to receive updates including free printables, organization tips, home improvement projects, recipes and more! |
More DIY Halloween Decorations
PS I love seeing your creations! Be sure to take a photo and tag #cravingcreative on Instagram! You can also stay in touch with me through following me on Instagram, Pinterest, and subscribing to the newsletter!
Heatherp says
I’m planning on doing these for Halloween this year and using my cricut to cut the Jack-o-lantern faces using black vinyl. I did want to clarify one thing that another commenter asked but don’t believe was answered. When you cut one of these out of the corrugated plastic and you fold it up to make the open-ended box, there is one side edge that won’t be attached. Did you use glue or what? I’m afraid to use a tape or anything like that bc it may show through.
Rachel says
You are so right! I did forget to mention that and I will edit it now. I taped the one side together with clear scotch tape. I haven’t noticed it show through.
NinaBean says
I am considering a bead of hot glue or E6000. Think this will hold on the corrugated plastic?
NinaBean says
Two quick questions: Do these have a bottom, and how do you seal the open edge of these?
Rachel says
These are meant to be waterproof so they have channels throughout the corrugated board that allow them to dry out well. So I didn’t create a bottom or top or seal them at all. Although I don’t live in a particularly wet climate, I have not had any problems with things getting stuck in the channels. The stakes keep them in place. Also, the measurements for me are because I used 20×20 yard sale signs and cut them in half. Therefore, they are 10 inches tall and the sides are 7 and 3 inches wide each. However, there isn’t any other reason for those specific measurements. Hope you love them as much as I do!
Frani says
These luminaries are the CUTEST!!!! Love that they are waterproof! You are so so clever!!! ♥
Rachel says
Thank you so much!