Learn the tips and tricks for painting a bathroom vanity that will last! This inexpensive yet professional-looking project saved our builder-grade vanity with a fresh coat of paint!
Painting this oak bathroom cabinet has been on our to-do list for years! We are so close to finishing up this bathroom renovation, that I almost can’t stand it!
So this is what we started with:
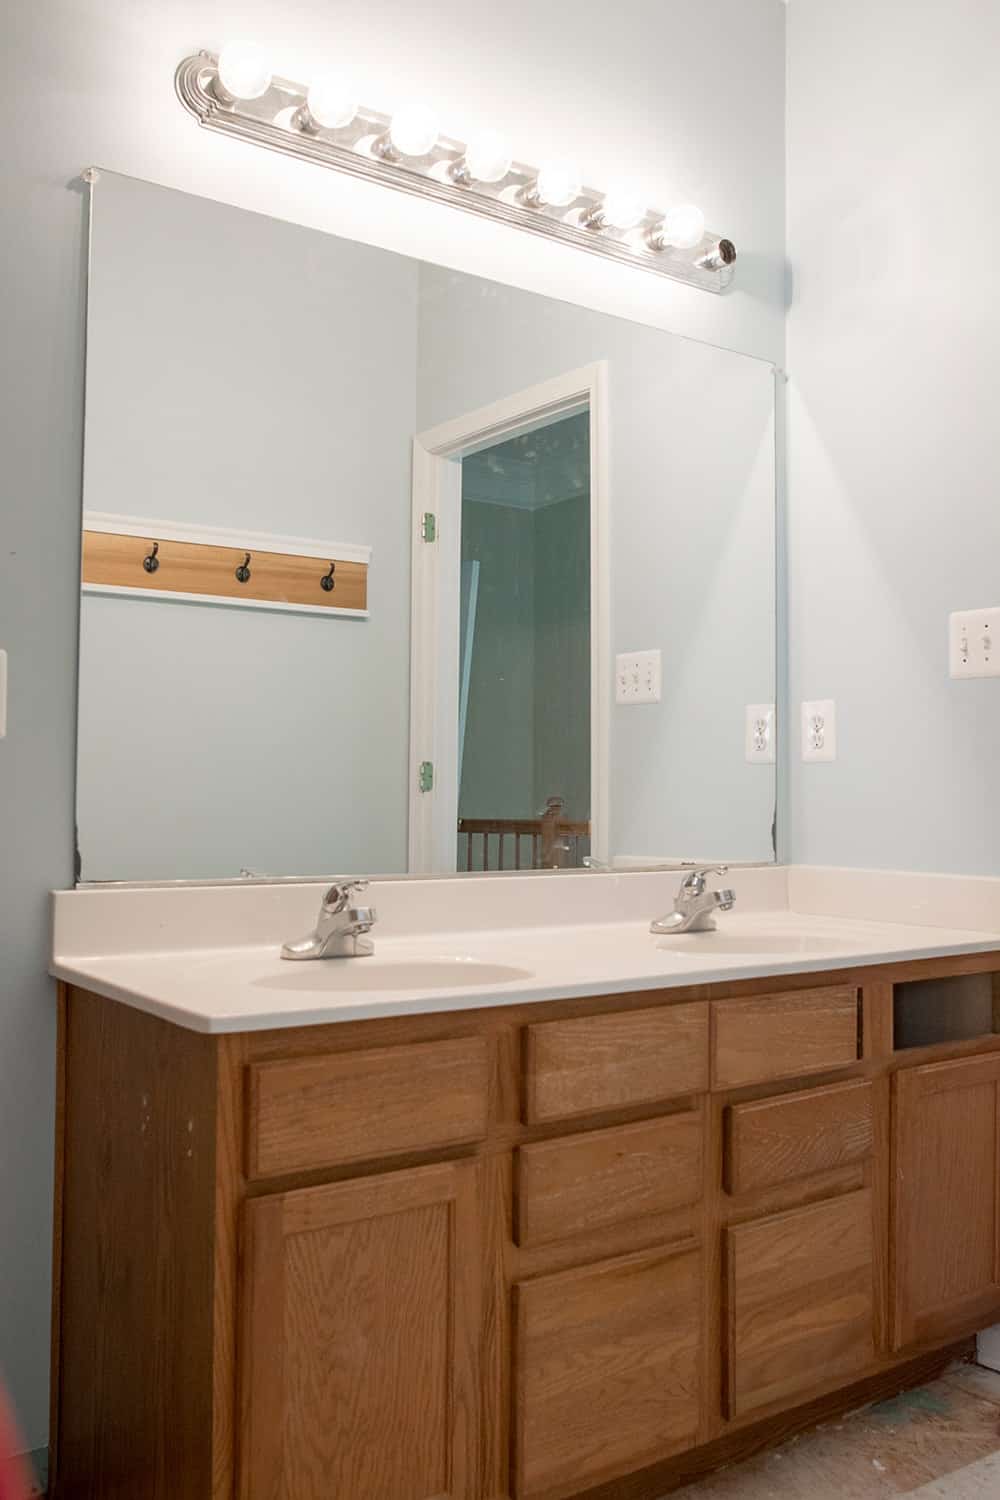
It’s not in great shape and the missing front piece has never been there since we moved in.
The awesome power of paint in a makeover never ceases to amaze and, frankly, I love that it is a huge budget saver. I have painted several furniture pieces over the years and am ready to tackle a little different job.
With only a quart of paint, the right tools, and a little knowledge, I made this into to a more modern guest bathroom!
Looking for some paint color inspiration for your project? I have scoured the internet to find specific examples and real-life paint examples in our post on Colorful Furniture Makeovers, 20 Sage Green Cabinet Paints, and the Best Blue Cabinet Paint Colors.
While it might seem like an intimidating project, with the right tools and some good advice, it's perfect for a beginner DIY project. If this is a project you've considered tackling, this post will give you the step by step how-to to get it done! Let's go…
Best Paint for Refinishing Bathroom Cabinet Doors
My best suggestion for a high-quality paint to use for painting your bathroom cabinets would be to use an enamel or acrylic type of paint. Do not use wall or latex paint to paint furniture!
I prefer Fusion Mineral Paint (which is an acrylic emulsion-based paint) for it’s waterproof matte finish that is HIGHLY durable. That is what I used for this bathroom makeover. I also really liked the color.
You Can Buy Fusion Mineral Paint Here.
I have tested many paints over the years, though, and have collected a giant list of the best paints for furniture to help you find the right one for your project!
Recommended Paint Project Supplies
- TSP Cleaner – A good quality degreasing cleaner should be fine too.
- Orbital Palm sander or mouse sander – 120 and 220 (or higher) grits
- Sanding blocks – this is for any areas that need hand sanding like details, edges, or inside corners.
- Painter’s Tape
- Stain-Blocker or Shellac Based Primer. These are only needed for very light or white colors. With Fusion mineral, I don’t need to prime a project unless it’s a tricky surface like laminate furniture.
- Paint Brush - my favorite for a smooth finish is 1.5-inch taklon brushes you can buy at craft stores. I have also used Wooster Angled Brushes and Purdy, which are good quality.
- Microfiber rollers
- Paint - (my favorites) Benjamin Moore Advance, Cabinet Transformations, Fusion Mineral, Rust-Oleum Chalked Ultra Matte
- Protective Topcoat - Here is my list of favorite protective topcoats. (optional- more on that later)
Pro Tip: If you use sanding sponges, I recommend getting a slightly lower (more coarse) grit than you would normally use in sandpaper. For example, instead of 220, I would use 180 grit or 80-100 to replace 120. The sanding sponge has a softer backing and seems to need a little more grabbing power than hard back sandpaper to provide the same smoothness. Also, save your sandpaper with these sandpaper cleaners!
Before Starting
The first step when painting a bathroom vanity is to remove the drawers, doors, and any cabinet hardware present so that only the frame is left.
If you are changing out the hardware to a different size, fill any holes in the old hardware.
Next, clean the frames and all doors and drawer fronts with either teaspoon or a household cleaner if the cabinet isn’t too nasty. I try to limit how much chemicals and teaspoon I use these days as it is quite strong and leaves a filmy residue that can be tricky to fully remove.
How To Prep Furniture for Painting
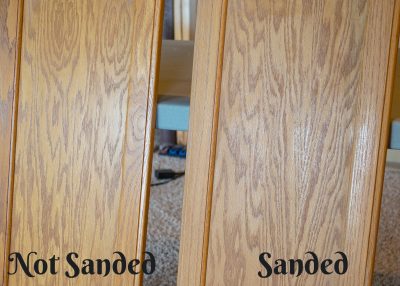
After cleaning, lightly sand the surface. The best bond requires some sanding, so I do not recommend skipping the sanding step. You want your paint to have the best bond for long-lasting results and a perfect finish.
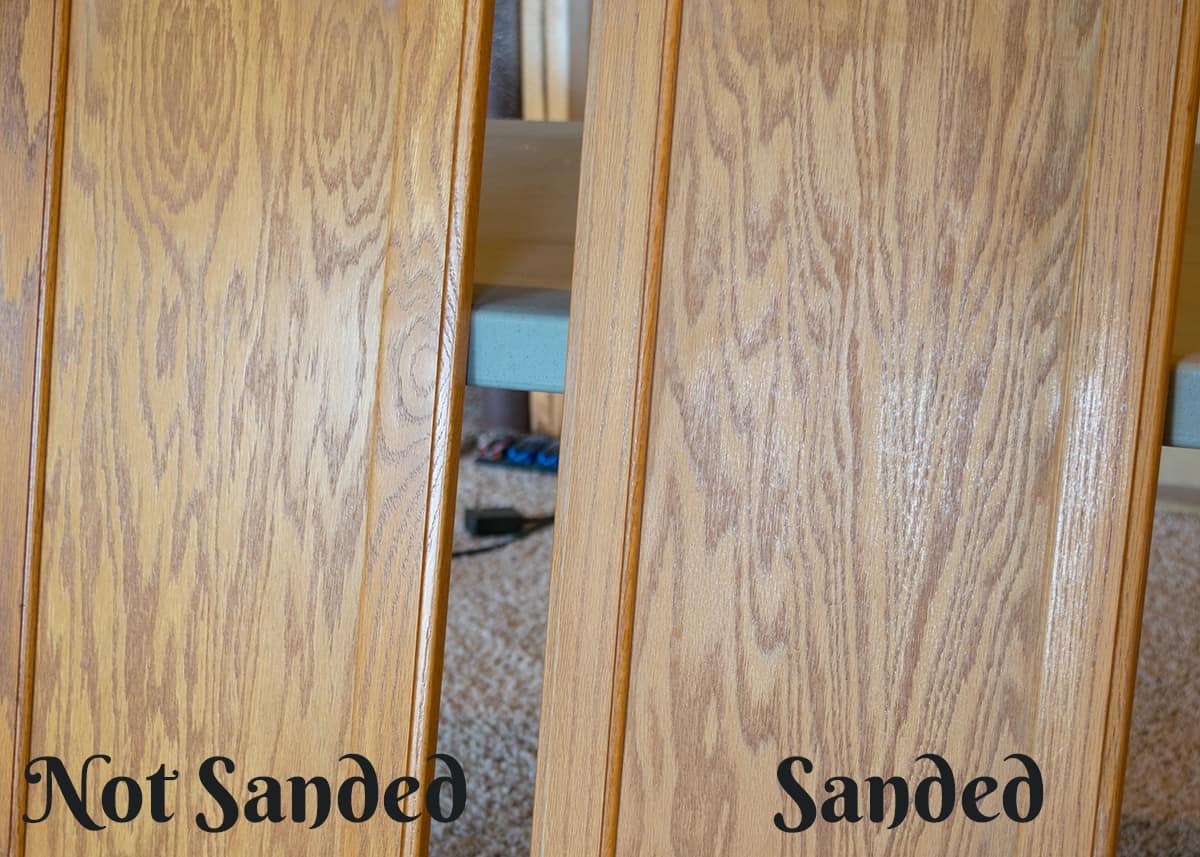
For sanding, you only need to “rough up” the surface. Unless the finish is peeling or breaking down, you do not need to completely remove all previous stain and varnish. I use an orbital sander with 80-120 grit and leave it at that. A 220 can be used for hand sanding any corners.
If you want to get a completely smooth finish on your cabinets and drawer fronts, we have a tutorial for filling in woodgrain on furniture. For dark colors with a matte sheen, I generally don’t find oak texture to be bothersome.
After everything is sanded, vacuum off the dust and wipe all of the surfaces down with a clean microfiber cloth or lint-free rag.
Tips for Painting a Vanity
Yes, the fun part! Here are some tips for the smoothest finish on your cabinets during your bathroom makeover:
- Get the right tools. A few extra dollars will save you a lot of heartache and frustration. I prefer fine taklon brushes like you find at craft stores for the least amount of brush strokes, but Purdy Brushes are also good especially if you have a self-leveling paint.
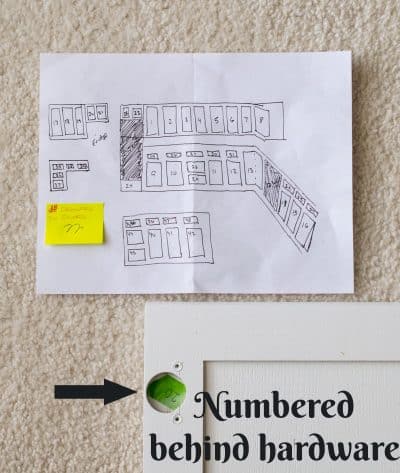
- Number the doors before you paint them. It just makes things a little easier, particularly if you have a lot of drawers that are the same size. The photo below is from a kitchen I painted.

- Use an orbital sander with 100-120 grit sandpaper for the fastest, no marks removal of finish. You can sand with 220 just before the last coat if you like.
- Use a lint-free roller across all flat surfaces for the smoothest finish. Most paints prefer a low nap microfiber roller, but a few work well with foam rollers.
- Brush/rolling works better with matte paints than high sheen. A paint sprayer will consistently produce no brush marks though.
- Brush detail areas, then roll large flat surfaces before the paint has time to dry. You will get the best results, and this will eliminate brush strokes for a smooth paint finish.
- Paint in the direction of the grain. Painting across grain will look sloppy and show more brush strokes.
- Use a sandpaper cleaner block. Sandpaper is shockingly expensive, and you can usually make the sandpaper last twice as long with these cleaning blocks.
- Save rollers overnight. If you can’t finish a project all the coats in one day, it’s perfectly fine to wrap your rollers tightly in plastic wrap between coats for a day or two.
More furniture transformations!
- How to Eliminate Brush Marks or Strokes
- How to Paint Laminate Furniture
- How to Paint Old Kitchen Cabinets
- How to Paint a Stair Rail that Lasts
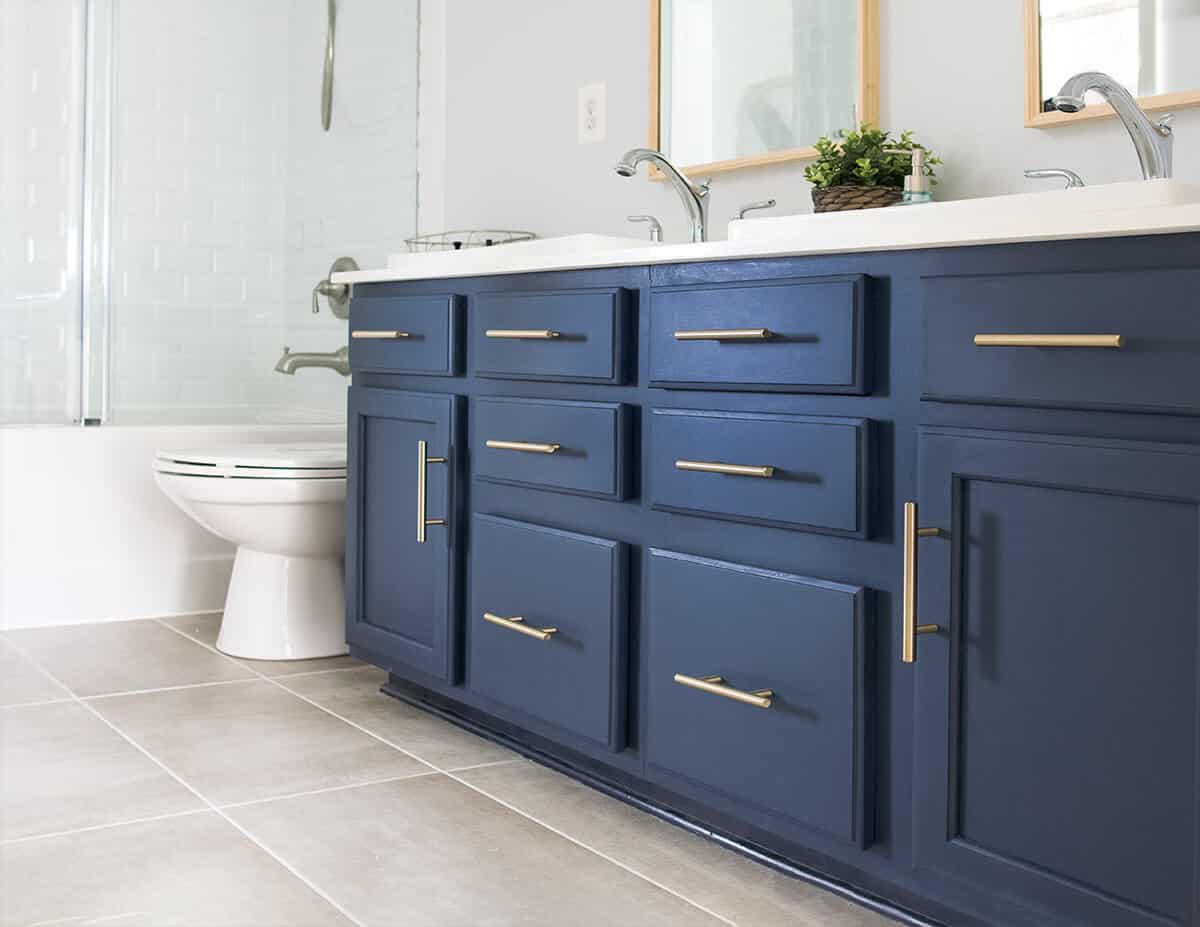
With a brush and microfiber roller, I painted 2 coats of paint. And that’s it!
Because I wanted to add hardware to this vanity, I drilled holes in each piece and screwed them in just like any other hardware.
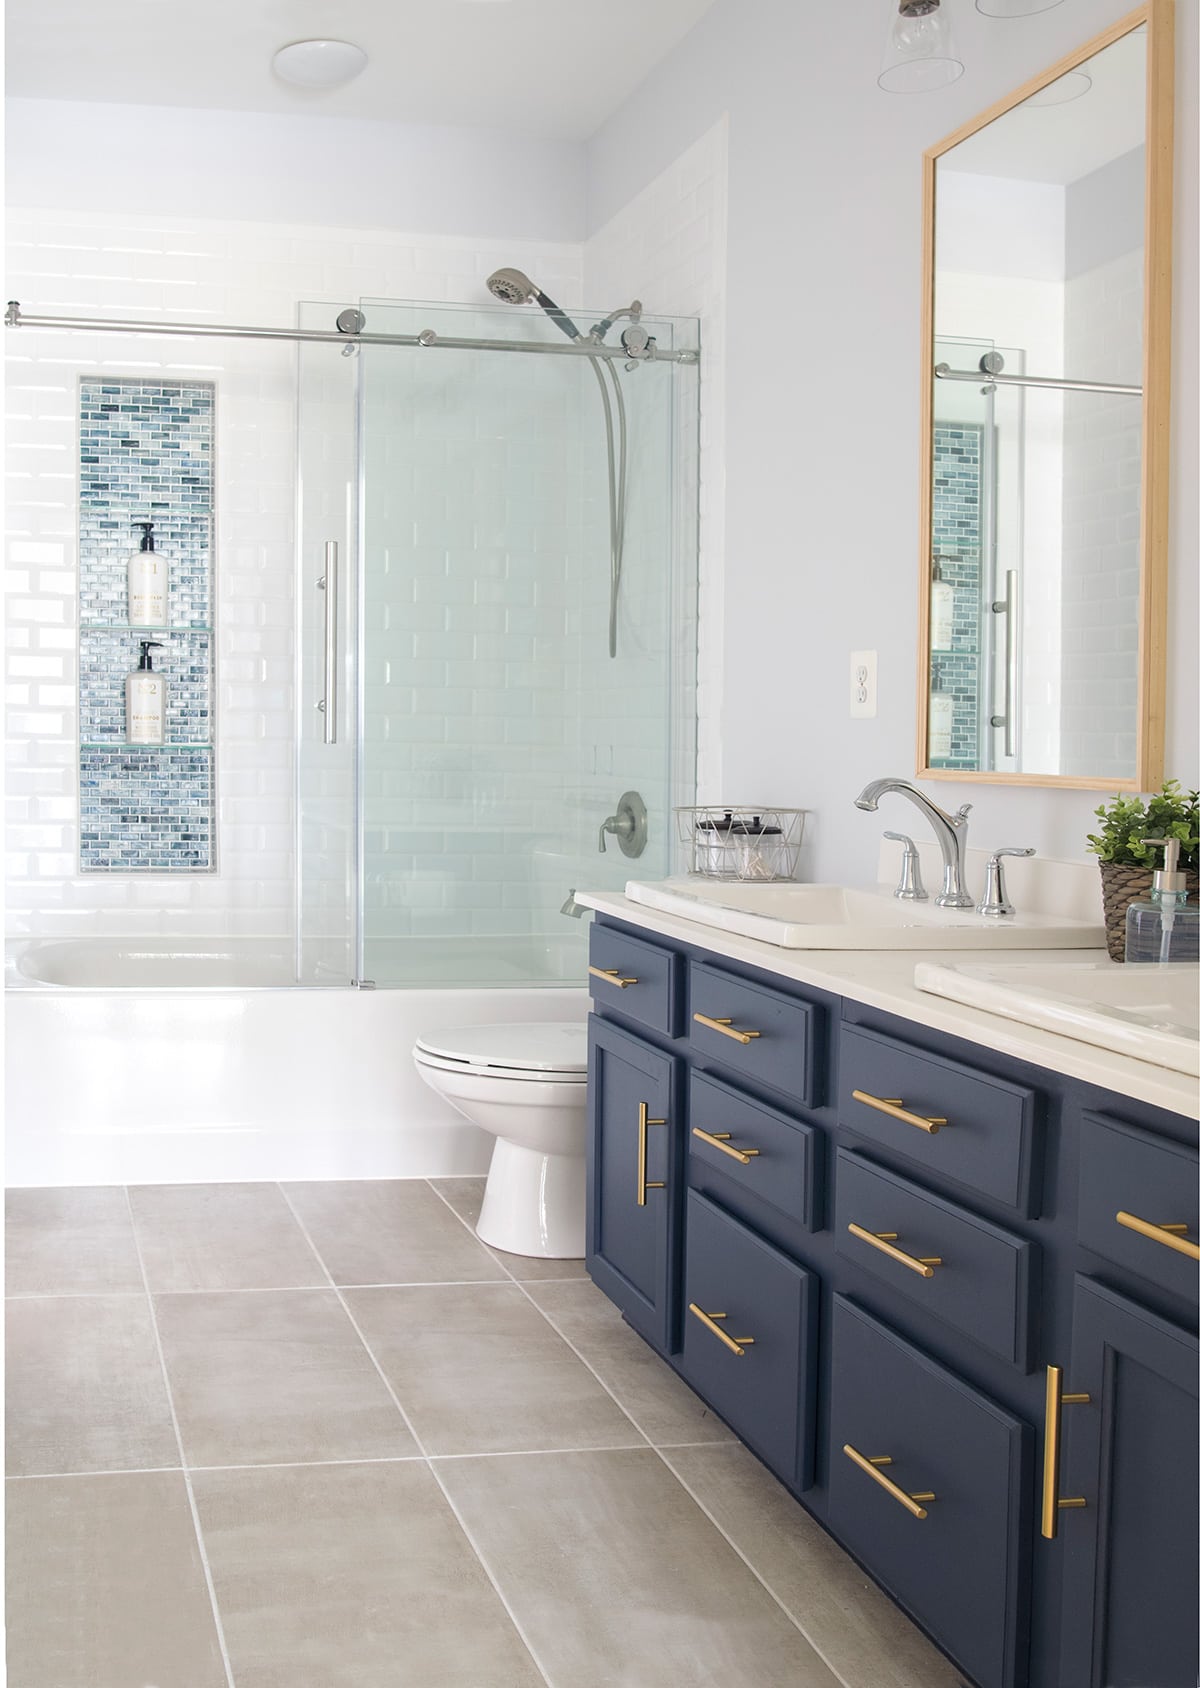
See our full bathroom remodel reveal here.
Frequently Asked Questions
Yes! If you do not have any of the below problems, I would skip priming:
1. You are using an enamel paint that doesn’t require priming.
2. There is no risk of stains, tannins, oils, or grease coming through the paint. You do need to prime unfinished wood and knots every time.
3. You aren’t painting bright white (I like to use a stain-blocking coat of primer for white).
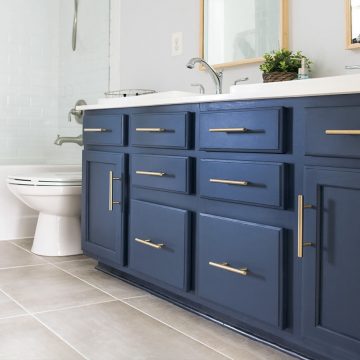
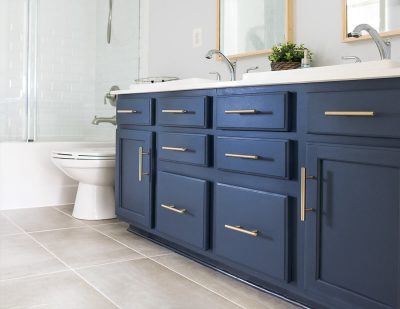
The color is Midnight Blue from Fusion Mineral Paints. The above pictures are the best reference for what the true color looks like in LOTS of natural light. However, it does appear darker at night or in shadow (it looks almost black). If you like navy blue, check out our post on the best Navy and Blue Cabinet Paint Colors.
I usually don’t paint the inside of the cabinets because it just isn’t worth the effort for me and is prone to scratching from heavy objects. Instead, I have used high quality contact paper or sealed the insides with a very durable clear coat to protect these areas.
Moisture is definitely going to be a factor when deciding what paint to use. As a result, I would use an enamel or acrylic type of paint. Fusion Mineral Paint is an Acrylic emulsion-based paint rather than something like chalk or latex which I would never use in a bathroom.
You can read more about the best paints for furniture here which shows my personal recommendations developed over years of refinishing and living with painted furniture.
No. The biggest misconception I see in painting is the idea that you need to sand between coats. Sanding is required only if your paint is not smooth to your liking and you are looking for a smoother surface. Paint bonds to paint without a problem.
With the paints I use, a topcoat is not usually required except in high traffic areas like kitchen cabinets. If you do choose to add a protective topcoat, read my recommendations on the best topcoats for furniture to help make a decision. Just make sure that it is water-based.

Grab our free series "Weekend Home Projects that will Transform Your Life" Sign up below to receive updates including free printables, organization tips, home improvement projects, recipes and more! |
More Furniture Painting Tutorials
PS I love seeing your creations! Be sure to take a photo and tag #cravingcreative on Instagram! You can also stay in touch with me through following me on Instagram, Pinterest, and subscribing to the newsletter!
How To Paint a Bathroom Cabinet
Tools
- Orbital Sander with 120 and maybe 220 grit sandpaper
- Mouse Sander optional – better for corners
- Sanding Blocks
- Paint Tray
- Roller Frame
Supplies
- Degreasing Cleaner or TSP
- Sanding sponges 80-100 grit
- Paint's Tape
- Paint brushes see post for recommendations.
- Lint-free microfiber rollers
- Paint See my favorites to use in Notes
- Protective Top Coat Optional, but recommended.
- Stir sticks
- Something to prop up the doors/drawers for drying I use solo cups.
Instructions
- Prep the Vanity. Remove the hardware as well as the doors and drawers. Clean all surfaces using a degreasing cleaner. If you need something stronger, you can use TSP for getting grime and dirt off. Repair scratches with wood filler as necessary.
- Sand the surface. Sand enough to remove any sheen or gloss. An orbital sander with 100-120 grit makes the sanding much easier. 120 grit can be used for hand sanding any corners.
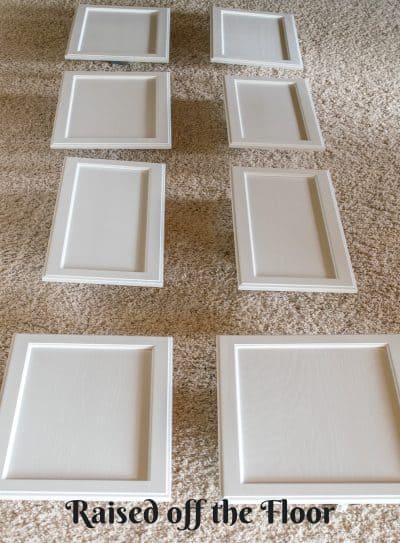
- Prepare your paint space. Tape off any edges you don't want painted such as under countertops or walls. For doors and drawer fronts, I allow them to dry on top of solo cups so they don't touch anything. If I left the drawers fronts on the drawers, it is fine to carefully put them in the vanity in open position to dry.
- Paint. See my notes below to decide if you need to prime first. Because these are small projects, we brush the details and then roll the large flat surfaces. Brush with the grain and always from one end to the other. If paint starts to dry, don't go back over it. Finish them off with a roller brush before the paint has time to dry for the smoothest finish.
Notes
- Painting over dark cabinets with a light or white color
- Oak Cabinets that have bad stains stains like deeply embedded oil or markers.
- Cabinets with knots in the wood such as knotty pine.
- Raw or unfinished wood.
Cindy says
This was very helpful.
Faye says
What color blue is this? I loooovveee it!!
Rachel says
The color is Midnight Blue from Fusion Mineral Paints. I make the caveat that it looks darker in person because I have LOTS of natural light from a door opposite it. However, it does appear darker at night or in shadow (it looks almost black).
Virginia says
How much paint did you need?, I have those exact cabinets and would love to do this.
Rachel says
I used less than a quart for this project.
Karen says
Thank you for taking the time to post your project. Do you recommend painting the cabinet before or after the countertop is replaced?
Rachel says
I don’t believe it makes any difference really, except if you are concerned about matching colors. I have painted both before and after changing the countertops, but I did know what the new countertops would look like if a client was changing them.
Riley says
I am completely stunned by how much better your bathroom vanity looks! The transformation is incredible! We had professional cabinet painters update our kitchen cabinets and they turned out so beautifully! We want to try DIY cabinet painting for our master bath now. So excited to use your guide!
Luz says
Hi, this is not related to the paint, but where did you buy the cabinet hardwares? It is really pretty.
Luz
Rachel says
Thank you! I got them from Wayfair here. (3 inch on the drawers and 3.75 inch on center on the doors)
Jason says
What did u do for the counter tops? Did u do them ur self or have them done?
Great looking work
Rachel says
We installed new countertops ourselves. I go into more detail in this post: How To Replace a Vanity Top. That is a different bathroom, but the process was essentially the same.
Sadie says
We have been thinking about updating our bathroom and we want to give DIY cabinet refinishing a try. We had our kitchen cabinets refinished by N-Hance and they turned out beautifully. I’m so glad I found your post! I never even considered that moisture in the bathroom would make a difference in the paint we should use. Thank you for the tips!
Kristin and Bryan Hart says
Hi-
What is the color you used on your bathroom walls?
Rachel says
The walls are Benjamin Moore Iced Cube Silver. Although it is a pretty subtle gray, it takes on a hint of blue when paired with navy or other stronger blues.
Emily says
Hi there! What topcoat (if any) did you use on this project? I read your topcoat post, but still can’t make a decision. I’m starting with the kids’ bathroom this spring break, so I want it to be durable and wipe-able (hello, toothpaste spittle). Thanks so much!
Rachel says
I was intending to put a top coat on this project but it has held up so well with the Fusion that I never did. We use this particular vanity for the kids as well.
Alex Sutton says
This looks awesome! I’m getting ready to paint my bathroom cabinets, so this is incredibly helpful as I make sure that I have everything and do it correctly! Thank you for sharing your experience! I hope my cabinets turn out as good as yours did! Finger crossed 🙂
CC says
I love your mix of metals! I was hesitant to go with brass hardware since my fixtures and faucet are pewter/silver. The brass framed mirror just brings it all together!
Emily says
I felt inspired by your post and I’m about to redo my cabinets. I had two questions- Did you use Krud Kutter or any surface cleaner before sanding down your cabinets? Also, what brush did you use for this project? Ive heard so many mixed recommendations. I read your post about brushes, which was very helpful. I’ve also read about Zibra angled brushes and Staalmester oval brushes as well- have you tried either of those? Thoughts? I appreciate your two cents! Thank you!
Rachel says
Hi Emily. Great questions. I usually use TSP (tri-sodium phosphate) and a good degreaser if necessary. Simple Green or Grease Lightening are sometimes what I use for degreaser. However, I am familiar with Krud Kutter and it’s a good product. I have a few Staalmester brushes and they are more of a boutique type brush. I like the oval brushes for the perfectly-imperfect pieces, aging, distressing, old-world, etc. I am not familiar with the Zibra brushes specifically. I will have to look at those. I will say that if there is a project that I want to be brushstroke free and I don’t have a sprayer, I try to use a smooth surface microfiber roller on all flat surfaces rather than a brush. It’s faster than a brush you don’t have as many problems backbrushing over partially dried paint. I hope that helps and I will look into the Zibra brushes.
Jake says
Do you have any tips on removing the original countertop without damaging the cabinets?
Rachel says
The old countertop was caulked around the edges underneath and to the wall, so I simply cut the caulk with a razor knife and lifted it out. There are a couple of different ways that countertops, both kitchen and bathroom, are installed. I have a post that is has good information on removing countertops here.
Kim says
My bathroom cabinets were painted with rusteoleum chalk paint. I have not put on the top coat yet. I’m not sure I like feel right now or how it cleans up. Will the top coat fix this? Or can I paint we with fusion mineral paint over this?
Rachel says
If it’s the chalk-flat sheen that you don’t like from the chalk paint, you can change the sheen a bit with a topcoat of your choice – it doesn’t have to be Rustoleum. I talk about my favorite top coats here. A top coat poly will be easier to clean without damaging the paint and more durable. Since the paint is fresh, you can also paint the fusion right over it as long as you aren’t having any bonding or flaking problems from the previous paint. Fusion is still a matte paint, but not quite as flat as chalk paint.
Leslye Shanberg says
Hi Rachel, are your cabinets real wood? I want to do this to my cabinets but they are like a plastic laminate. Any idea if I could still paint over that? If so, what kind of paint would I use?
Rachel says
Most all of the furniture I redo is comprised of wood, either plywood, solid wood, or a veneer of wood. I have a cabinet that I think is like yours, in that it is made of chipboard, but there is a hard thick plastic coating on it to make it white. In that case, I would recommend either a spray paint meant specifically for plastics or Fusion Mineral Furniture Paint. If there’s any way it can be sanded to at least take off the shine or what I call “roughing it up”, I would do that. You just want to increase the surface area to create a better bond, not remove the layer of plastic. Another type of cabinet that I have seen has a vinyl or paper-like print on it, although it looks sort of plasticky. In that case, I would use a super high-bonding primer, like Kilz Adhesion or Fusion Mineral UltraGrip. I would also very lightly sand something like this, although I have seen most skip sanding because that can cause more problems if mdf is under the print – mdf soaks up water and bubbles easily. Let the primer dry at least 24 hours before painting. I would recommend testing the process out in an inconspicuous place like the inside of the cabinets before going full restoration on everything. I hope that helps and that your cabinets turn out fabulously!
Jenny says
This is amazing! Quick question- did you run into any problems with the grain showing through?
Rachel says
The grain wasn’t bad on this particular set after sanding a little. It’s also a very dark color so that lessens how much the grain shows unless you look for it. If you are very concerned about the grain showing through, I have a post on how to remove woodgrain for painting cabinets.
Mina says
I was wondering the same thing. I plan to use Ben More Hale Navy to repaint my bathroom cabinets in a half bath. I’ve never done this before so your site has been INCREDIBLY helpful. I am definitely nervous and wondering if I should try to remove the grain given the dark color or if I shouldn’t bother (im a little worried I will ruin that.. given how thing the layers need to be to thin out the grain). What would you recommend for a first timer?
Rachel says
This is just my opinion. Unless it’s a super deep grain like oak or you have a specific vision, I personally wouldn’t worry about filling in the grain too much. I have done so many furniture makeovers that, for me, it’s just another step I try to avoid if I can get away with it, lol. A half bath cabinet shouldn’t be too much work, so that’s good. Benjamin Moore will usually recommend the advance alkyd paint for cabinets, in a satin. The cabinet above is a matte finish from Fusion Mineral. BM advance has excellent self leveling but satin is going to be shinier than the cabinets you see here, which will reflect light and the grain will be more apparent. Unless you have light (like a window or overhead light in front of the cabinet) shining on it, the grain still won’t show that much because of how dark it is. Since it’s a smaller cabinet, I wouldn’t worry too much about the beginner aspect of it. While sanding is always awful, using wood filler is beginner friendly with the right products. I hope that helps and good luck with your project! It will look great whichever way you decide.